


Crochet Black and White Cross Pillow Cover Pattern
/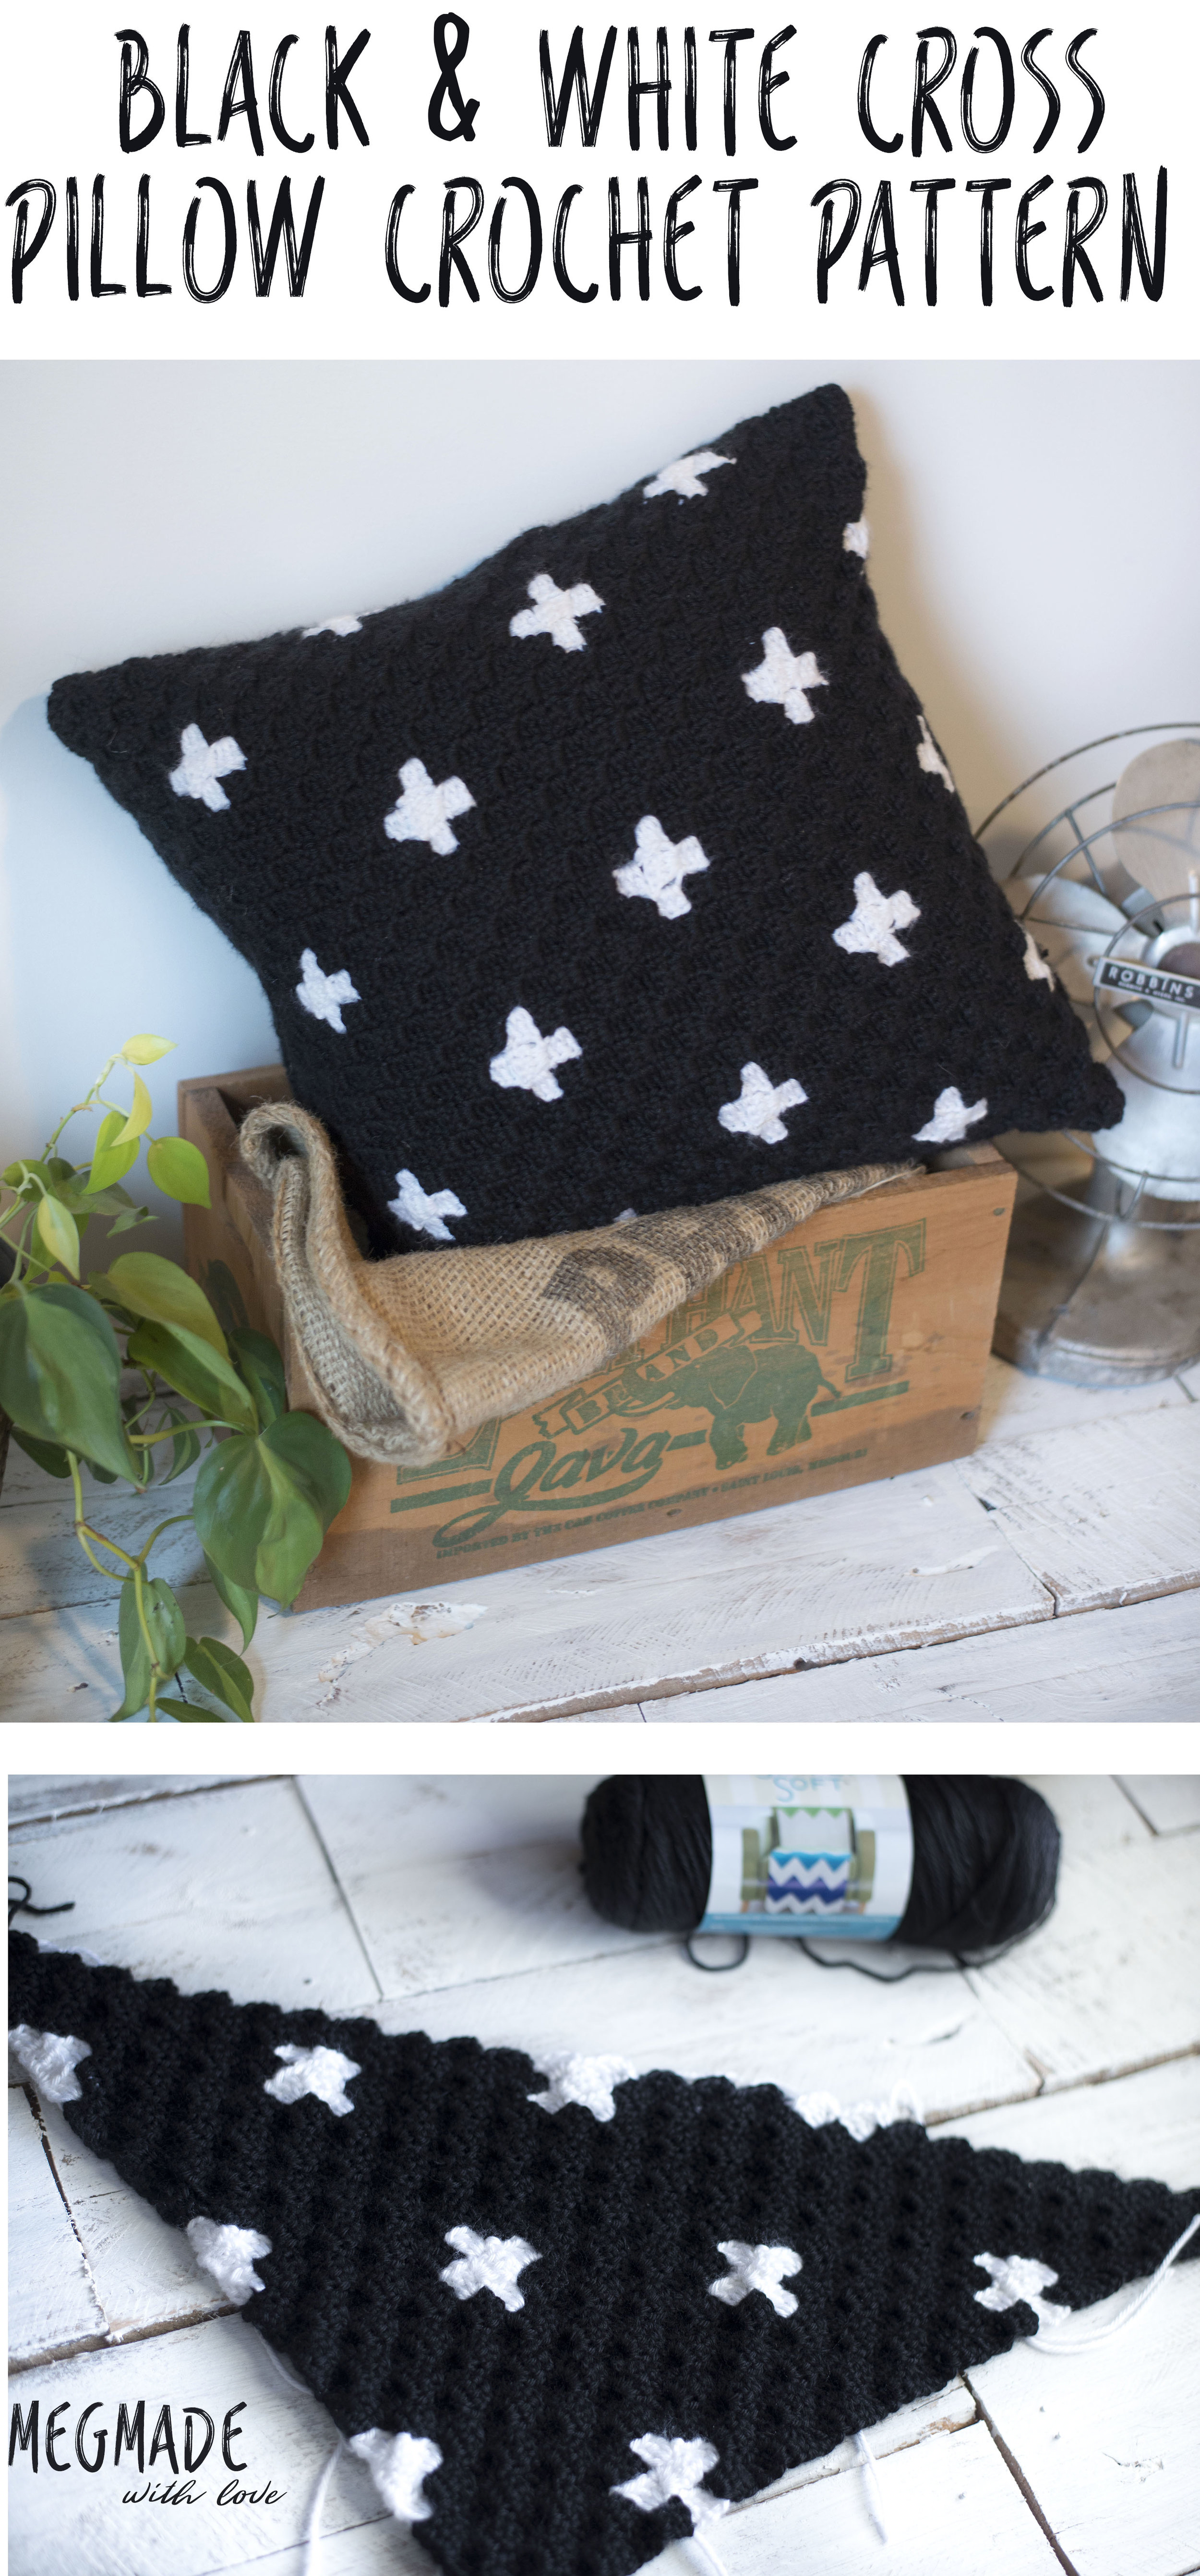
So this project has been a long-time coming, and I'm super excited to get it out into the world! I'm pretty sure I started it in February, but it just got pushed to the side for whatever reason and it seemed like I had to overcome way too many obstacles to get this sucker done! Which is kind of hard to imagine because it's just a pillow cover, but truly... I feel like this project was cursed. ha! So to say that I am relieved to finally be typing this blog post would be an understatement.

I will say that the way it turned out (which was PERFECT) made all the trouble worth it. I really like this pillow. It's simple, and cute and I love how the corner to corner design kind of made it look quilted.

Which leads me to my next point: this pillow was created using the corner to corner method of crocheting. If you've never tried your hand at c2c, then this is a great project to jump on in (there is a ton of good info on c2c here if you've never heard of it). Because guess what? This was my first c2c project! I was kind of hesitant to learn how to do it, but I'm really glad I finally did, because it's actually a really enjoyable way to crochet. Plus I feel like it works up quicker.

Below is the graph I created for the pillow. It is 29 rows by 29 rows, and after completed makes a 16x16 inch pillow.

For the pillow I used Caron Simply Soft in Black and White, along with a size F crochet hook (I thought this would make the squares more "tight"). If you chose to use another worsted weight yarn, I will say that it may be larger because Caron Simply Soft is slightly thinner than many other yarns it's weight.
So like I mentioned the pattern is for a pillow COVER, but you could make it simply a pillow if you felt so inclined. I made it with the design on the front side, and on the back I chose to do two pieces that buttoned together in black. When doing the back part, I had to learn how to crochet a c2c rectangle, which was interesting, but easy to get the hang of.

Above are the three pieces I used to make the pillow cover. I did the front in the cross design then made two smaller rectangles for the back, which I attached three buttons to.

As far as button holes go, the cool thing about c2c is that there are little slots that naturally occur in the project that were perfect for my buttons to slip right into. I had one inch buttons and those fit perfectly.
What you'll need:
Size F hook (3.75 mm)
Caron Simply Soft yarn in Black and White (3 skeins black, 1 white)
three 1" buttons
Large tapestry needle
16x16 inch pillow (I made mine with two pieces of black fabric and poly fill)
Black thread
sewing needle
Dimensions:
Approximately 16x16 inches
Instructions:
-So like mentioned before, above is the graph I made (using Stitch Fiddle, great resource!) for the front side of the pillow cover. This will be your guide to making the pillow.
-For c2c, you begin in one corner (and it doesn't matter which corner you start in). And you read the graph diagonally. A helpful tip is to mark off what row you just did with a pen or marker.
-For the directions on how to do c2c if you've never done it, I'm going to send you to this video created by The Crochet Crowd (its how I learned).
In the video, he will teach you how to begin the c2c, increase as well as read the graph. Also this video will explain how to c2c rectangle, which is what you'll need to know for the back of the pillow cover.
**An important note for changing colors** (I found this out the hard way) So, because the colors are so opposite, they will really stand out if you can see a color change. So what I found was, it didn't matter what color I just finished, if I was slip stitching into a different color "pixel" next, I would switch colors BEFORE slip stitching. And if I was changing from say for instance, white to black, but the next "pixel" color that I would slip stitch into was white(the same color), then I wouldn't change the color until AFTER I slip stitched. That make sense?
- So to create the front piece, you follow the instructions in the video, increasing until you reach row 29. Then after you have 29 rows, you will begin to decrease, until you are back at 1.
- Below are the two graphs for the rectangles to kind of make it easier to understand:


-I made the two rectangles that make up the back two different sizes, so they would overlap. And where the overlap is, is where the buttons will go. So unlike the square c2c, the rectangles are worked by an increase until you reach the last row of the shortest side of the rectangle (in this case the short sides are 16 and 18). Once you reach that amount, then you will begin to decrease on that side only, and you will be increasing on the other side until you reach the 29 rows you need for the bottom side. After that you begin to decrease on both sides of your work. This is also explained in the video I linked to above.
-SO.... in total you will have three crocheted pieces: the front square and the two back rectangles.
To sew together:
Take all your pieces, and place them wrong sides together. You will line up the bottoms of the rectangle pieces with the square and then overlap them in the middle. Pin your pieces together like this, making sure to pin at the "overlap".
Then you will take your tapestry needle and a long strand of black yarn, and stitch around the very edge of the pieces. Make sure to get BOTH of the rectangle pieces in the seam where they overlap.
Once you've finished that off, turn your pillow inside out. Next you will sew on your buttons.

So like in the photo above, you can see that in the c2c design, there is a natural occurring "hole" made perfect for buttons! Make sure your buttons fit in the hole before sewing them on. ha!
I evenly spaced my three buttons on the edge of the rectangle that was under the other bigger rectangle, making sure that the buttons lined up with the natural hole I was talking about above.
Then I sewed on my buttons with my black thread and sewing needle.
Then you grab your 16x16 inch pillow and slap that awesome pillow cover on there!! Ahh, how lovely to finish another project. :) :) :)

Enjoy your new and fancy cross pillow!
Love,
Meg


