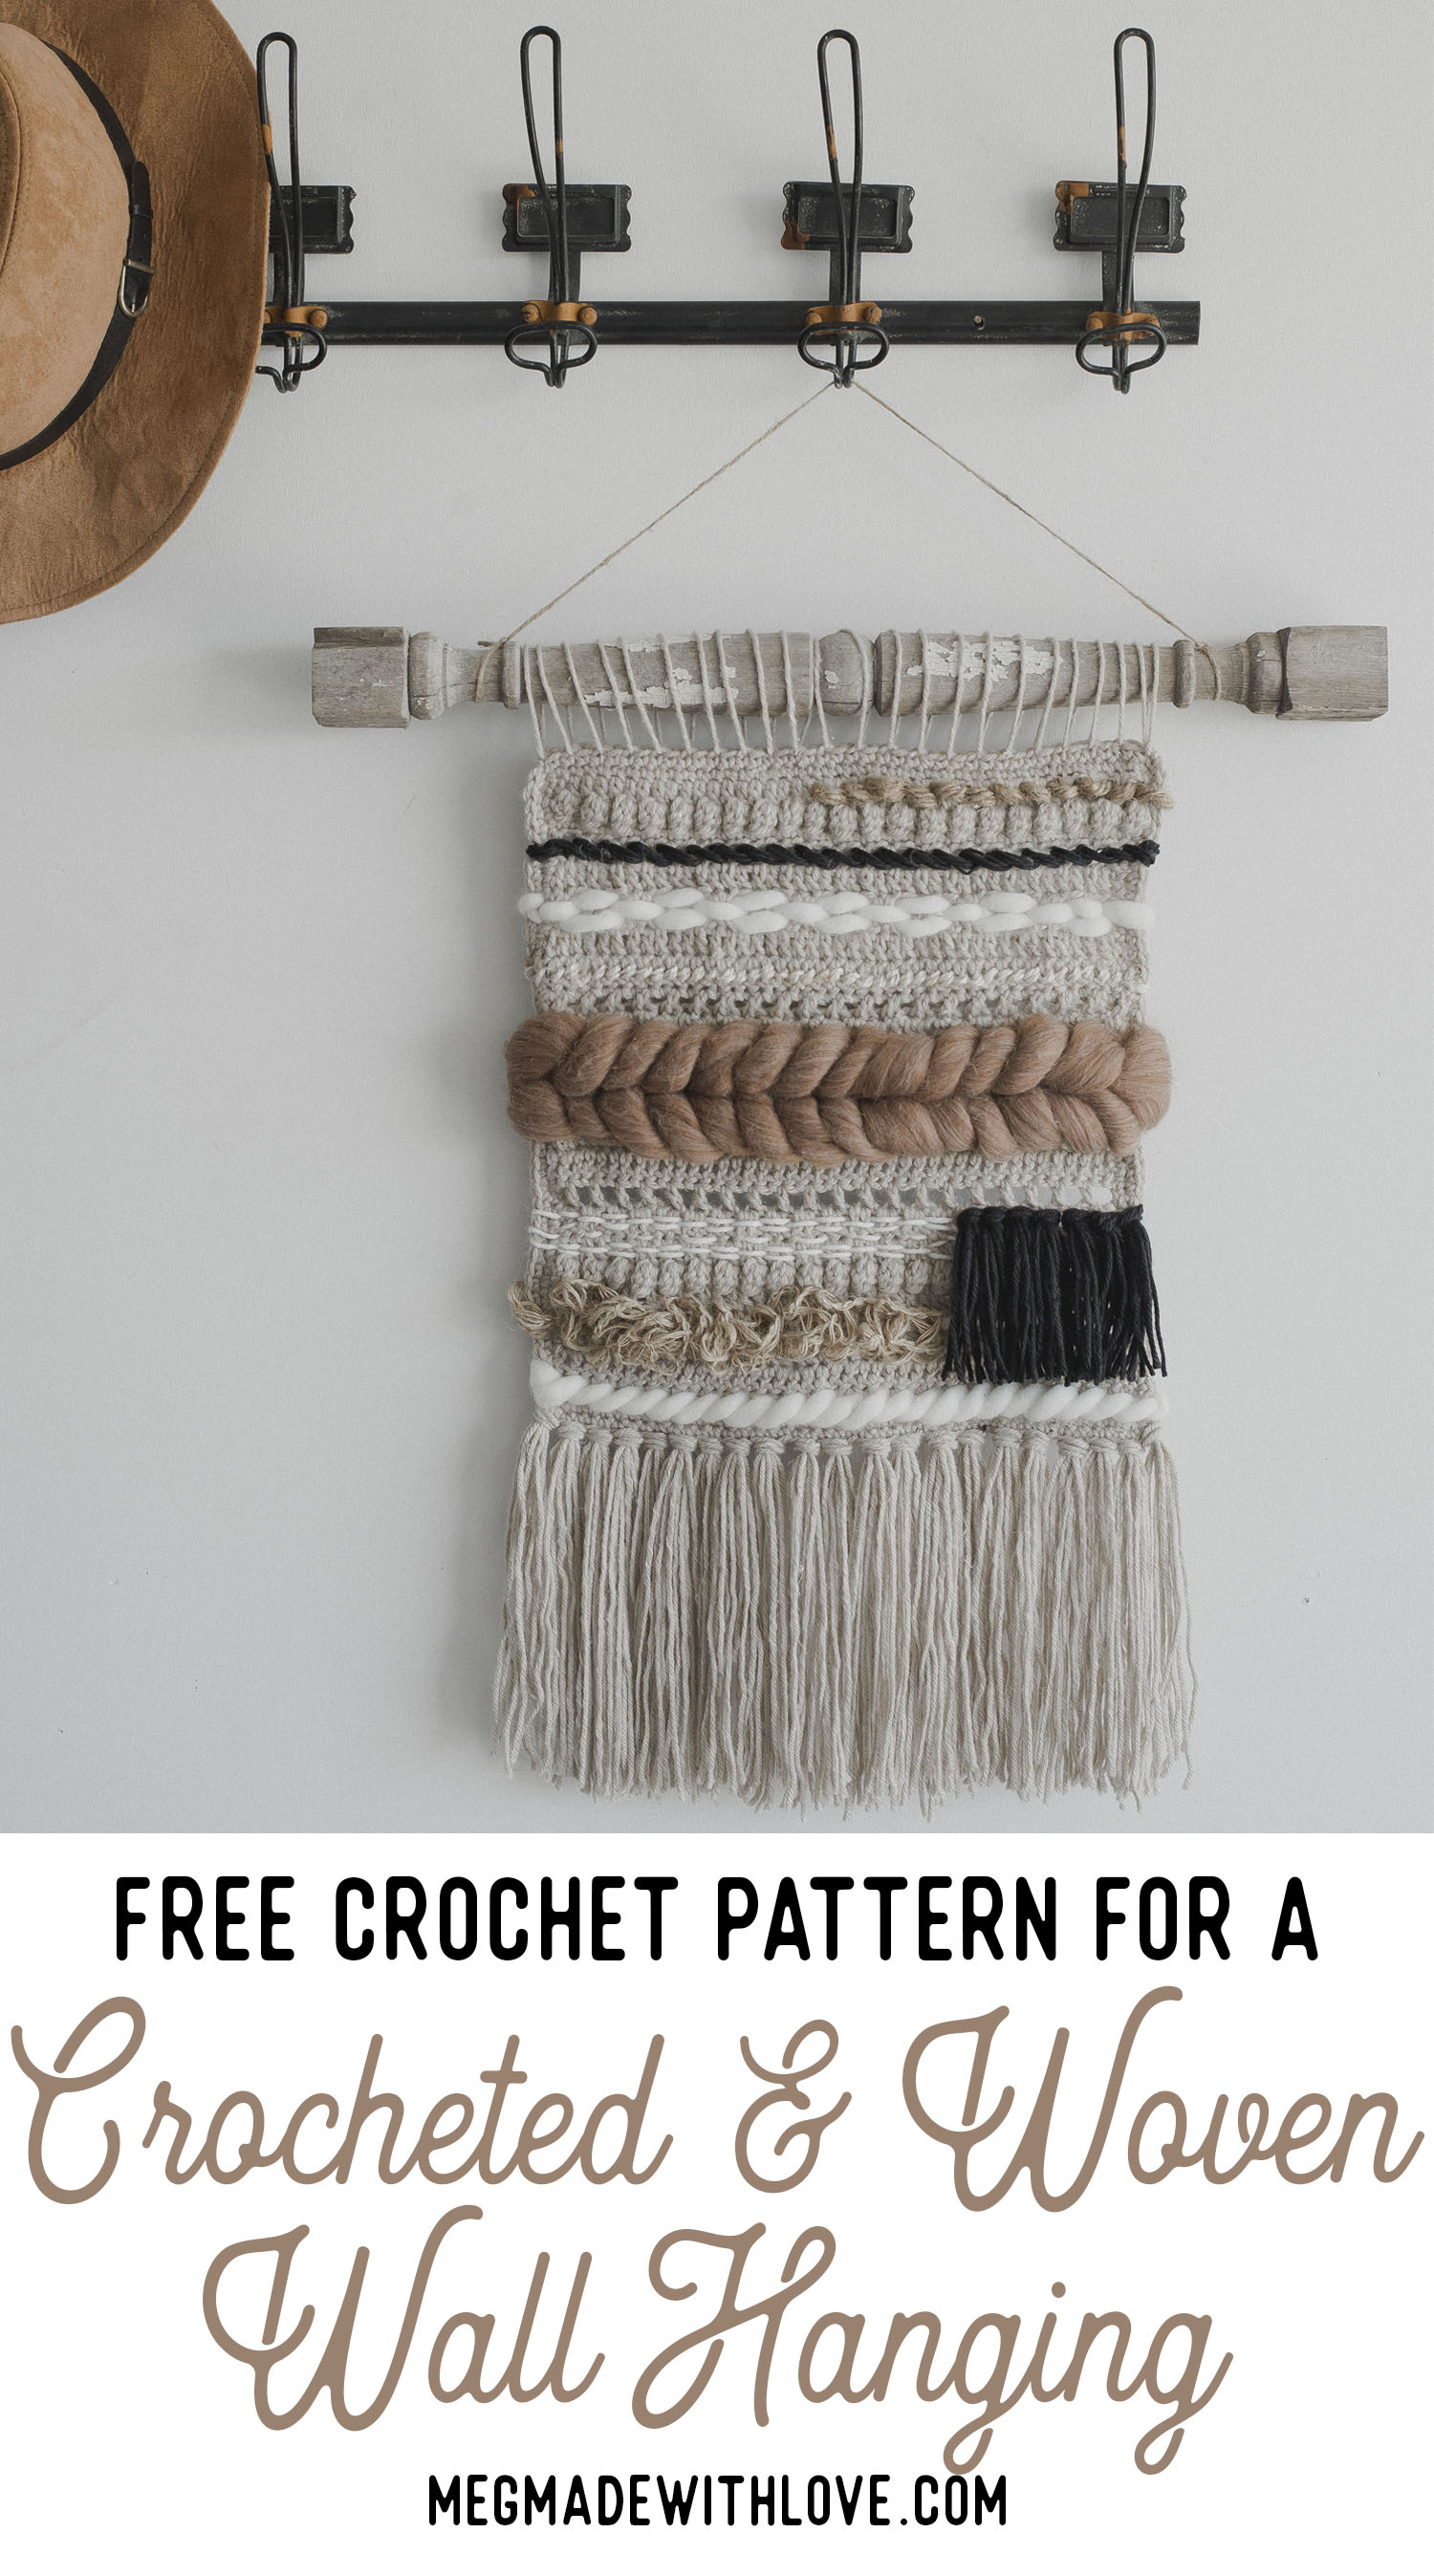
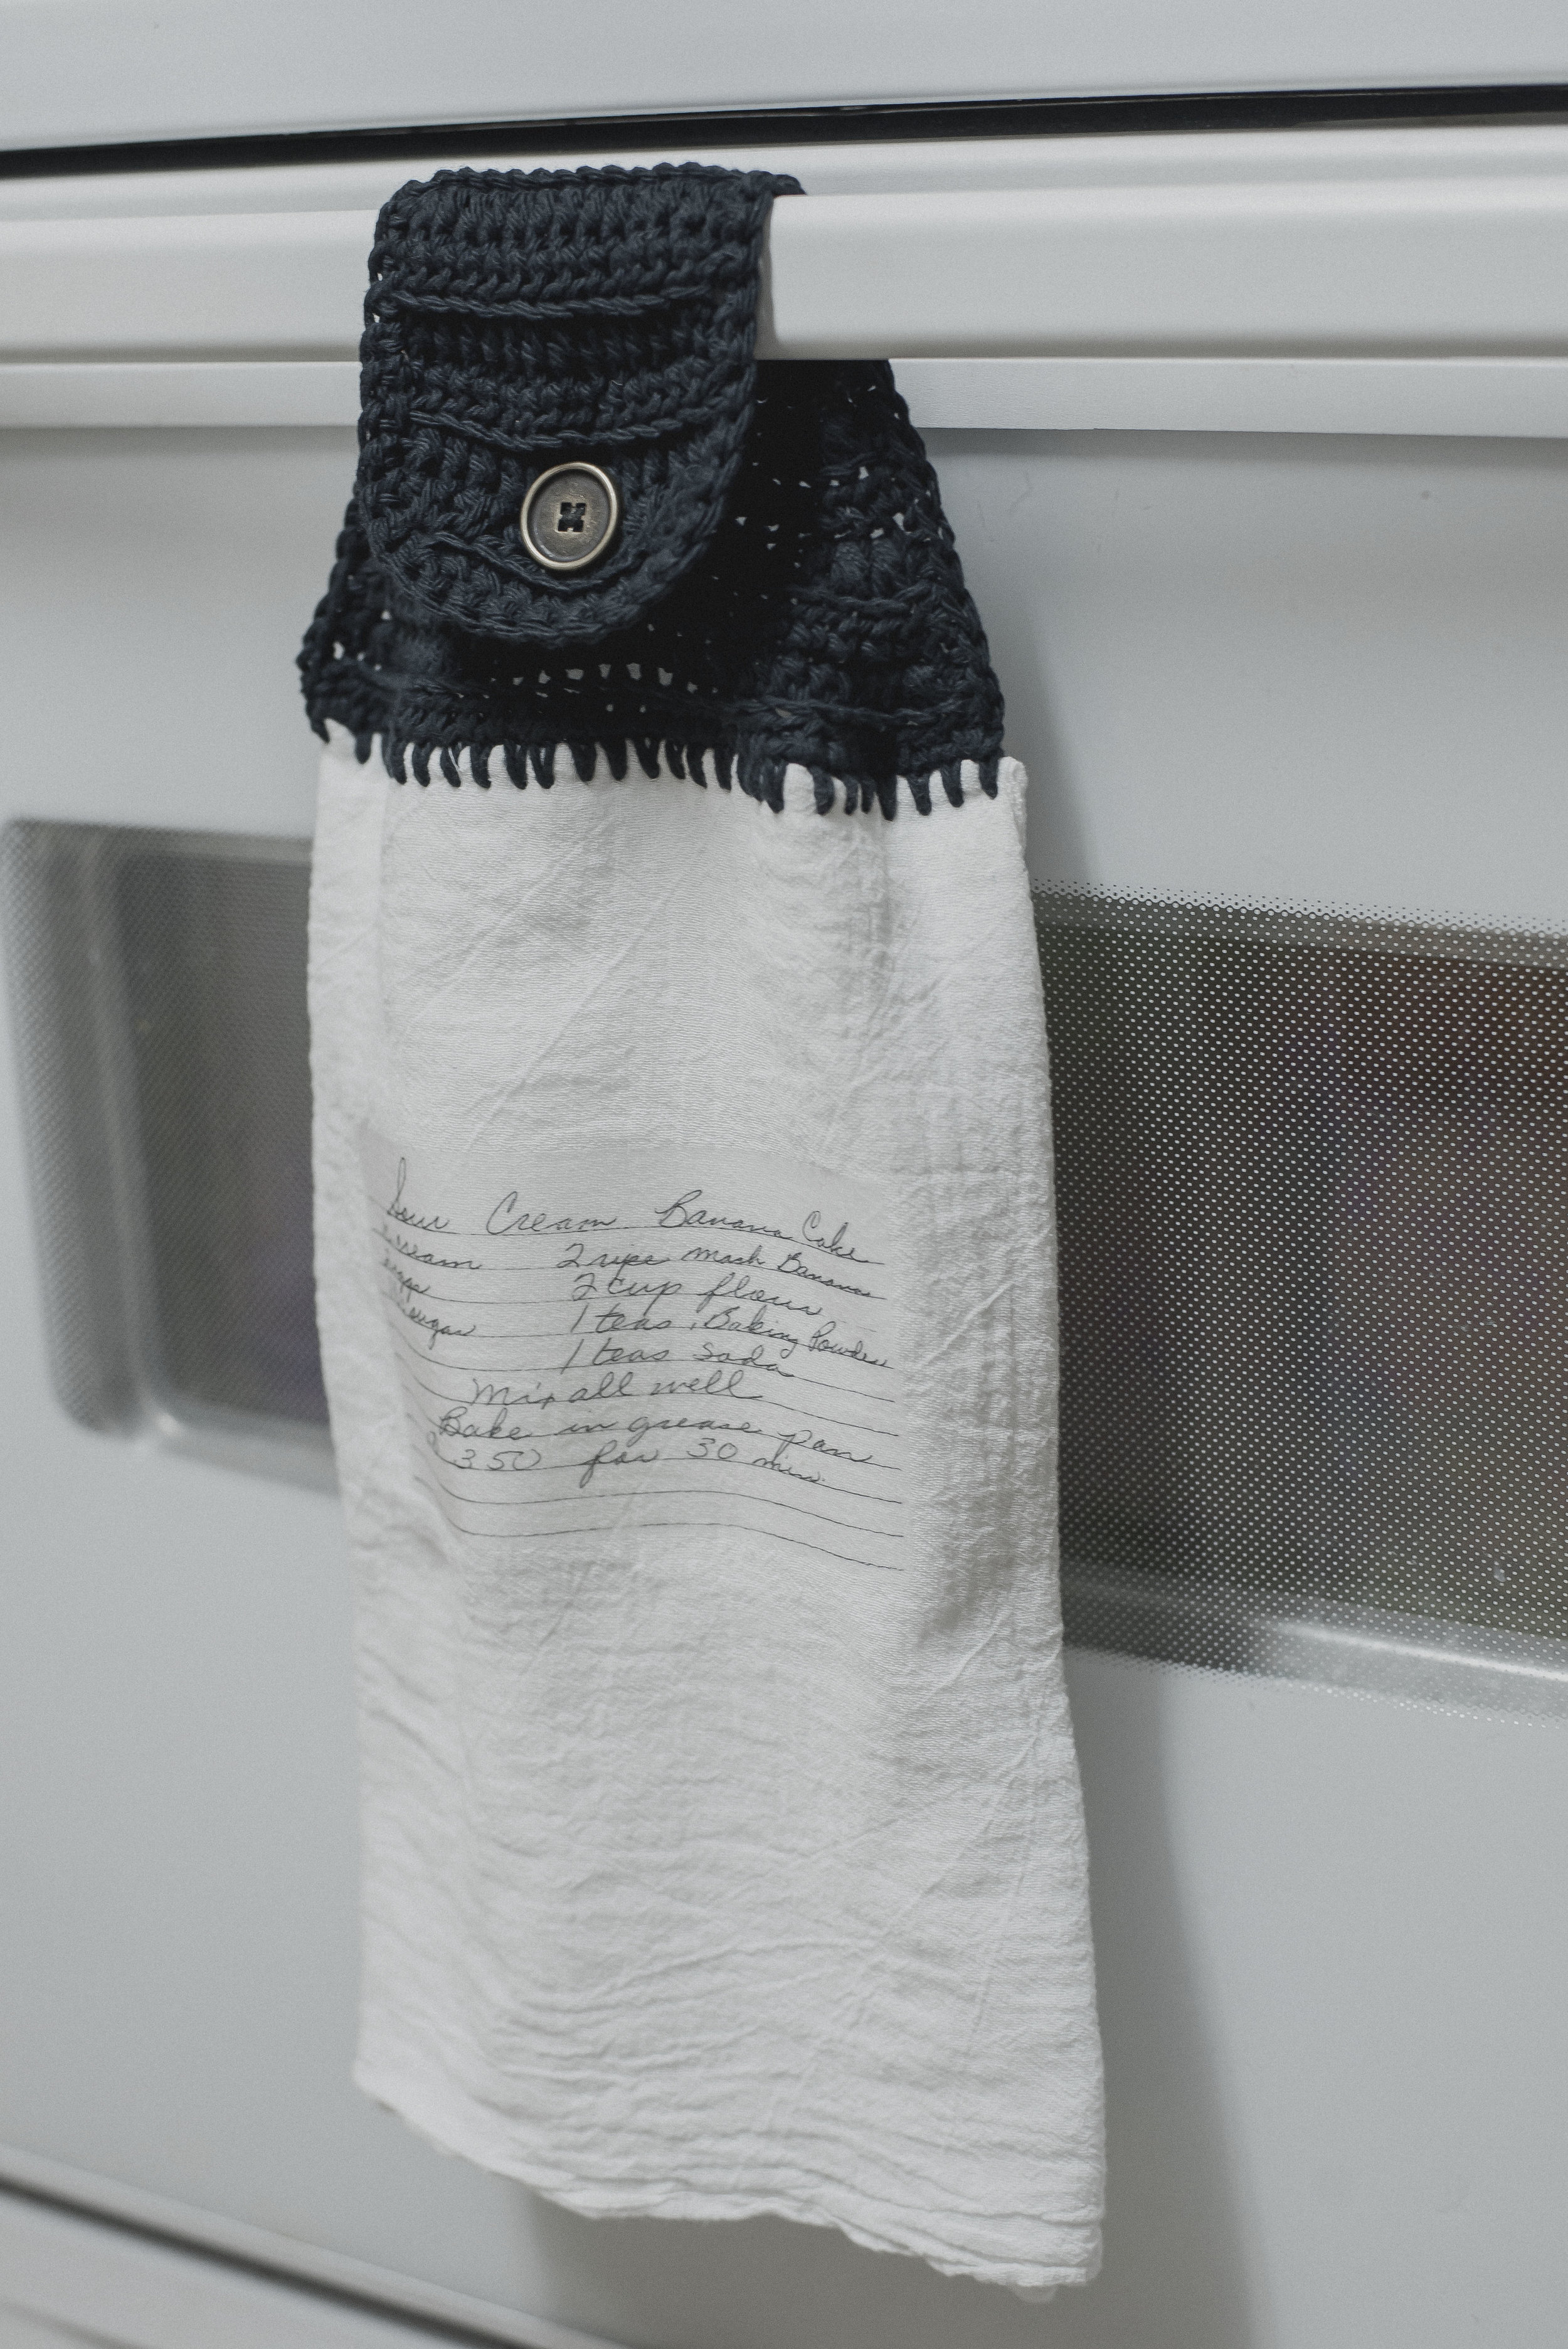
Crochet Pattern + Tutorial for Crocheted Recipe Towels

Crochet Pattern and Tutorial for Recipe Towel

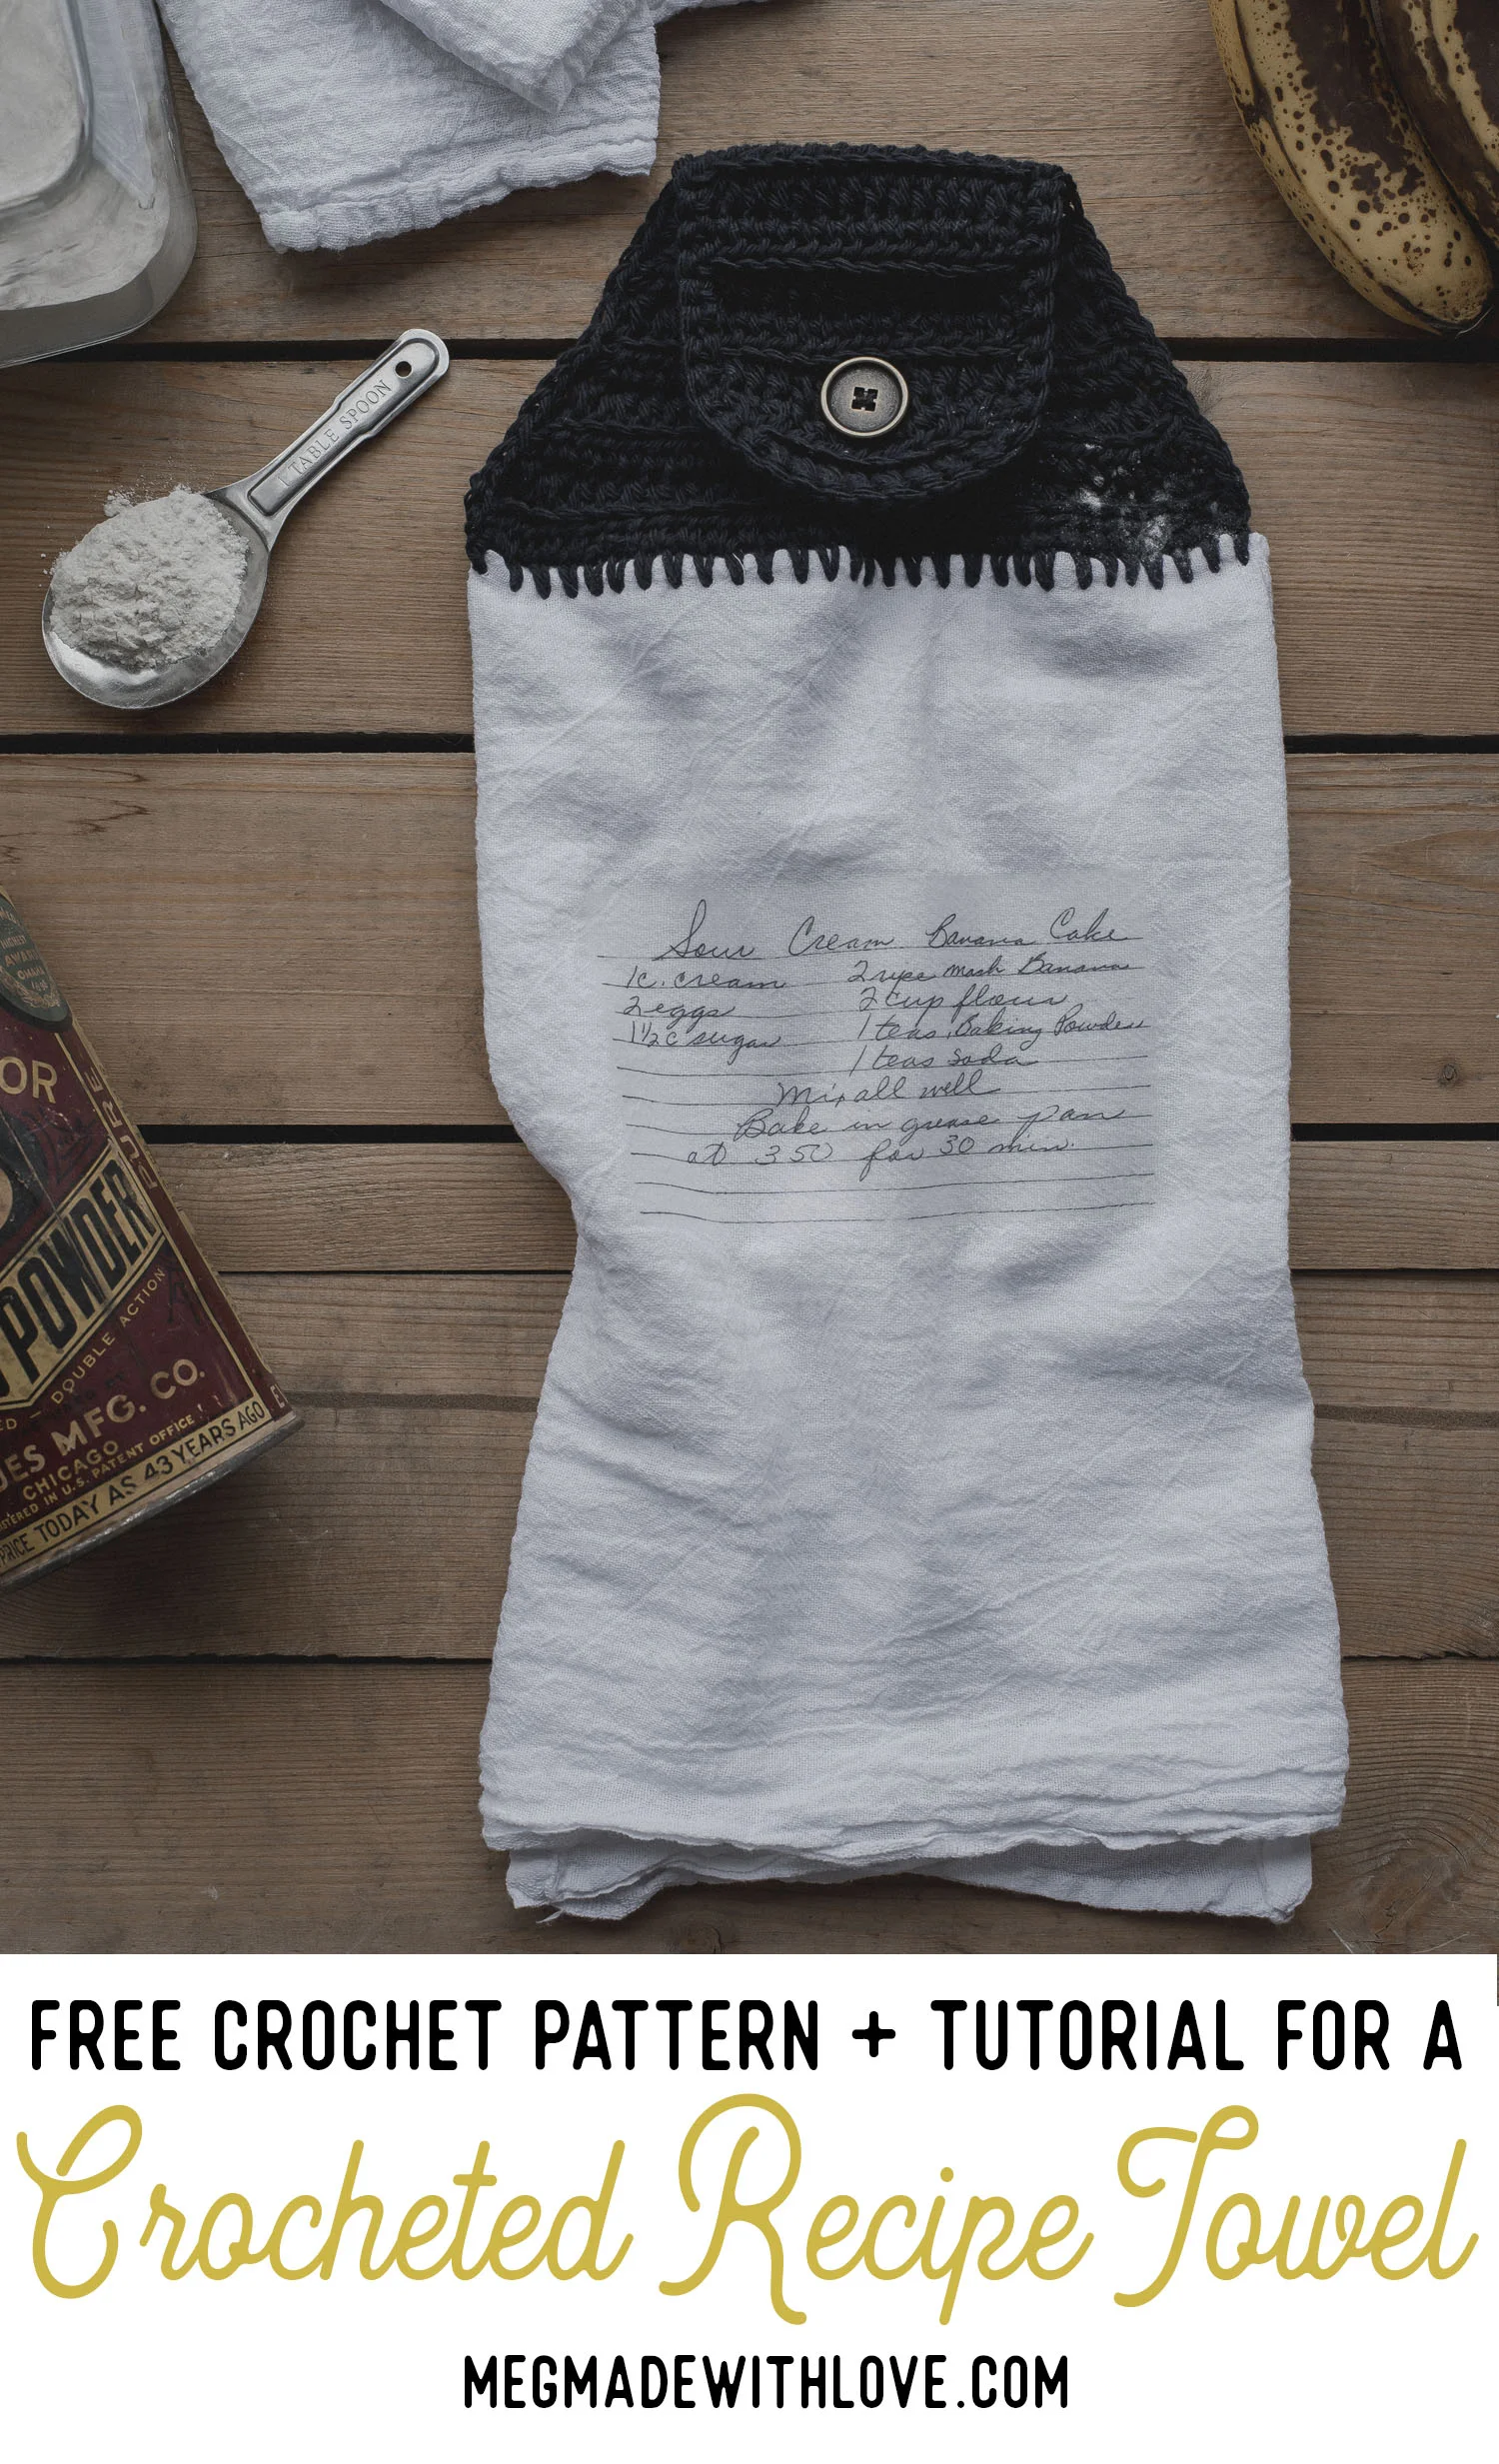
I've always thought the towels I've seen online were so cool--the ones with recipes transferred onto them, and that they'd be a great Mother's Day gift one day. But then it dawned on me they'd make an AWESOME gift if I took it one step further and crocheted on the top of it. And even MORE awesome if I wrote a post/pattern on it! So that's what this post will cover... both how to transfer those favorite recipes to a flour sack towel, and how to crochet on the top of the them. With Mother's Day next weekend, this pattern would be the best last-minute DIY gift for good old mom. :)

Free Crochet Pattern for Recipe Towel

This project does require a little stealthiness... you'll have to rummage through your mom's favorite recipe cards (I guess that's if you don't have your own copy, and as I was visiting my mom last month, I thought I'd see if I could find one of hers). She has this Sour Cream Banana Cake recipe I believe is from her mom, my grandma... and it is THE bomb. We'd always ask for that cake on our birthdays, and have it topped with cream cheese icing, oh man. Droolin'...

Free Crochet Pattern and Tutorial for Recipe Towel Topper

Someone suggested on Instagram that it would be cool to wrap the towel around a mason jar containing all the dry ingredients of the recipe-- which I thought was a great idea! 

For this post I'll start out with how to transfer the recipe onto the towel and then the pattern for the crocheted top will follow after that, towards the bottom. I hope you get to make one of these fun little towels!

Crochet Recipe Towels - Megmade with Love

What you'll need:

-handwritten recipe
-28" by 29" flour sack towels (I found mine at Walmart, these are also in craft stores in the embroidery section.)
-fabric transfer paper (It's important to use the "Light" kind, if you're transferring onto a white towel, I found mine at Walmart, Avery brand. You can also purchase on Amazon here)
-inkjet printer (laser printer will not work) & scanner
-computer, with photo editing program (I used Adobe Photoshop, which has a free trial version I believe, or you could use a free online program like Pixlr  )
-iron
-sewing pins
-ruler and pencil
-worsted weight (4) cotton yarn
-size b hook (2.25 mm)
-size i hook (5.5 mm)
-yarn needle
- 1"- 1.25" button
-thread and needle (for sewing button)

Transferring the Recipe:

To begin, scan in your recipe and save it to your computer.

Crochet Recipe Towels

Above is what my recipe looked like scanned in. It had pencils marks on it, as well as other marks and creases that I didn't want to show up on the towel so I edited it in Photoshop. Editing it will also make the recipe more contrasted and look more clear when ironed on.

Crochet Recipe Towels

To begin I adjusted the "levels" of the recipe. In the image above you can see the two pink arrows-- these are the two tools that make the "whites" more white and the "blacks" more black. You can start by clicking the white dropper-- the one on the far right. Next you will click in your recipe, an area that is supposed to be "true white", like the background. Once you click on the spot that's supposed to be white, it'll adjust your image for you and the background should appear more white. It works the same for the black dropper, just click a point in the text to make the writing look darker and "stick out" more.

Crochet Recipe Towels

Once you get your background to a good color, and the text to the darkness you'd like, then it's time to touch up your recipe. This can get as detailed as you'd like it to. I chose to remove all the blemishes and pencil marks, along with the outside edges of the recipe (I did decide to leave the lines). It would probably still look cool with all the blemishes too, it would give it some character! It would probably be smart to make the image black and white (desaturated), but then again, if you wanted it to be colored more power to you!

To remove the blemishes and edges I used the "clone brush tool" and the "brush tool"-- both are pointed to in pink in the image above. First I used the clone tool, this tool basically picks up an area of your image and covers a different area with it-- kinda like a touch-up. To use this tool I held the option key (alt key for Windows computers), and clicked on the area I wanted the blemished part to look like, usually an area very close to the blemish. Then you'll just click on the blemish until it looks natural. If you'd like a more in-depth tutorial for how to use the clone stamp brush, you can view this video.

Once I had all the blemishes touched up, I used the paint brush-- set to true white (#FFFFFF). Then I just painted all around the background of the recipe to make it all one color--white. Like I said above, it's not 100% necessary to have the background look perfect, it's just something I wanted to do.

Crochet Recipe Towels

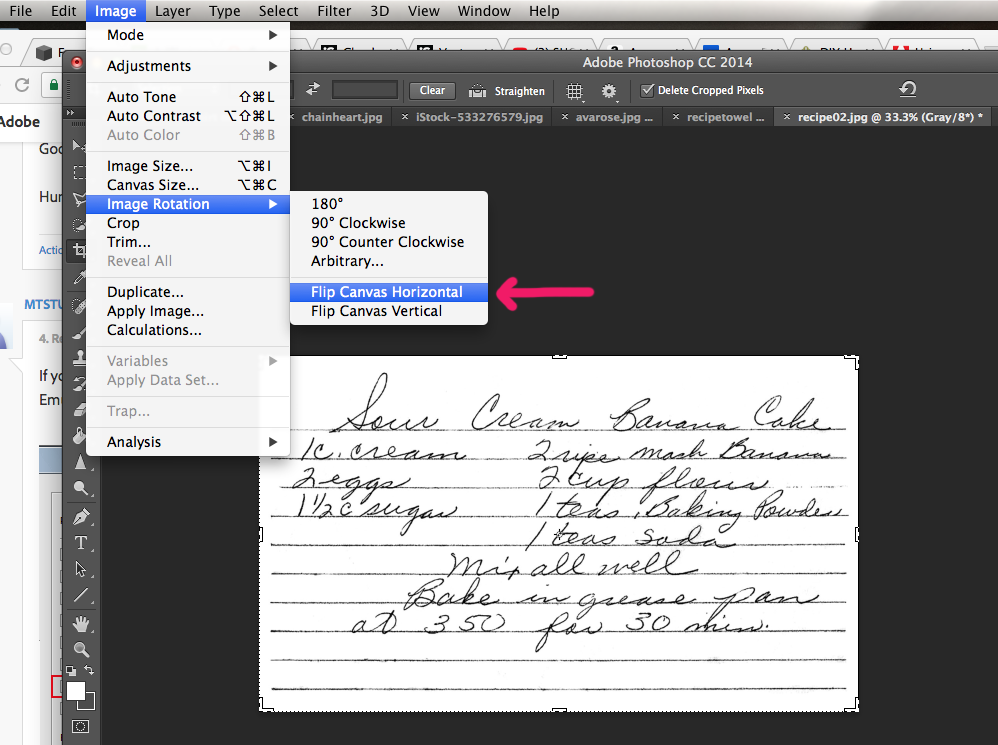
After you're finished making your recipe look the way you'd like it to, it's time to flip it. *This is important when ironing on your recipe because if you don't, it will come out backwards. To do this in Photoshop, you'll click "Image", "Image Rotation", and "Flip Canvas Horizontal". 

You will also want to decide how big you would like the recipe to be on your towel. For this pattern and the way I fold the towel for it, the maximum width for the recipe would be 8.5 inches. I chose to resize my recipe to 6 inches wide.

Crochet Recipe Towels

Next I created a new document, one that is 8.5 inches by 11 inches and 300 pixels per inch resolution (white background). This is for printing the recipe on your transfer paper and is the size of the piece of paper. Once your new document is open you will copy and paste your recipe onto it. 

Screen Shot 2018-04-26 at 4.22.20 PM.png

To do this is Photoshop you'll select all of your recipe (command + A), copy (command + C), then go over to your new document and paste (command + V). I chose to paste the recipe twice into the new document just in case, plus it would waste less paper. If you're making more than one recipe towel, you could put different recipes on one page.

Next you'll insert your transfer paper into the printer and print your recipes. Your paper may have special instructions that you need to follow on printing, just be sure to read up on those just in case.

Crochet Recipe Towels

Then you'll grab your towel. I chose to wash and dry my towel before transferring. It didn't say it was necessary, but I just thought I would. In the image above you can see the towel folded up-- I was planning where I'd place the recipe. To fold the towel, first you'll fold in half, and then into thirds. I chose to iron my towel before transferring the recipe because it was pretty wrinkled up. You'll want it to be nice and flat for the image to go on well.

Crochet Recipe Towels

Grab your recipes, then cut them out. I cut pretty close to the edges. 

Crochet Recipe Towels

Now you're ready to iron on your recipe. I unfolded the "thirds" folds and then placed my recipe faced-down in the center, a little towards the top (totally up to you where you want it to be!). 

The directions on the transfer paper said not to use a ironing board, so I just used a countertop. It also instructed to use the "cotton" setting on your iron. 

Crochet Recipe Towels

My transfer paper directions specified to not use water in the iron and to apply pressure slowly from left to right then top to bottom, and over the edges. I ironed for about 2 minutes, then let it cool for a couple of minutes. 

Crochet Recipe Towels

After the towel is cool, slowly peel the corner backing off the recipe away from the towel. I'm not gonna lie, I was kind of surprised mine worked out perfectly the first time.

This concludes the tutorial for how to transfer the recipe to the towel!

Crochet Pattern

Notes:

-ch's at the beginning of the rows do not count as sts

-it's not incredibly important to have a specific amount of stitches-- just that you try to work your stitches into the towel 1/4 apart. 

-you will start out with the 2.25 mm hook for the first row, and then you will switch to the 5.5 mm hook for the remainder of the towel. This is because the 2.25 mm hook allows you to work into the towel because it's so little. You could also sew a blanket stitch along the top and work stitches into that, or you could use a skip stitch blade-- just some additional options.

Abbreviations:

ch=chain, sc=single crochet, st(s)=stitch(es), hdc=half double crochet, hdc2tog=half double crochet two together (or hdc decrease), sk=skip, BLO=back loop only

Crochet Recipe Towels

Row 1) To crochet the top, you'll fold up your towel back into the "thirds" and pin the top folds all together with sewing pins.

Crochet Recipe Towels

Next I drew a line across the very top of the towel with a pencil about 1/4 of an inch down from the top. This will be a guideline for the first row of stitches to be worked into the towel.

Crochet Recipe Towels

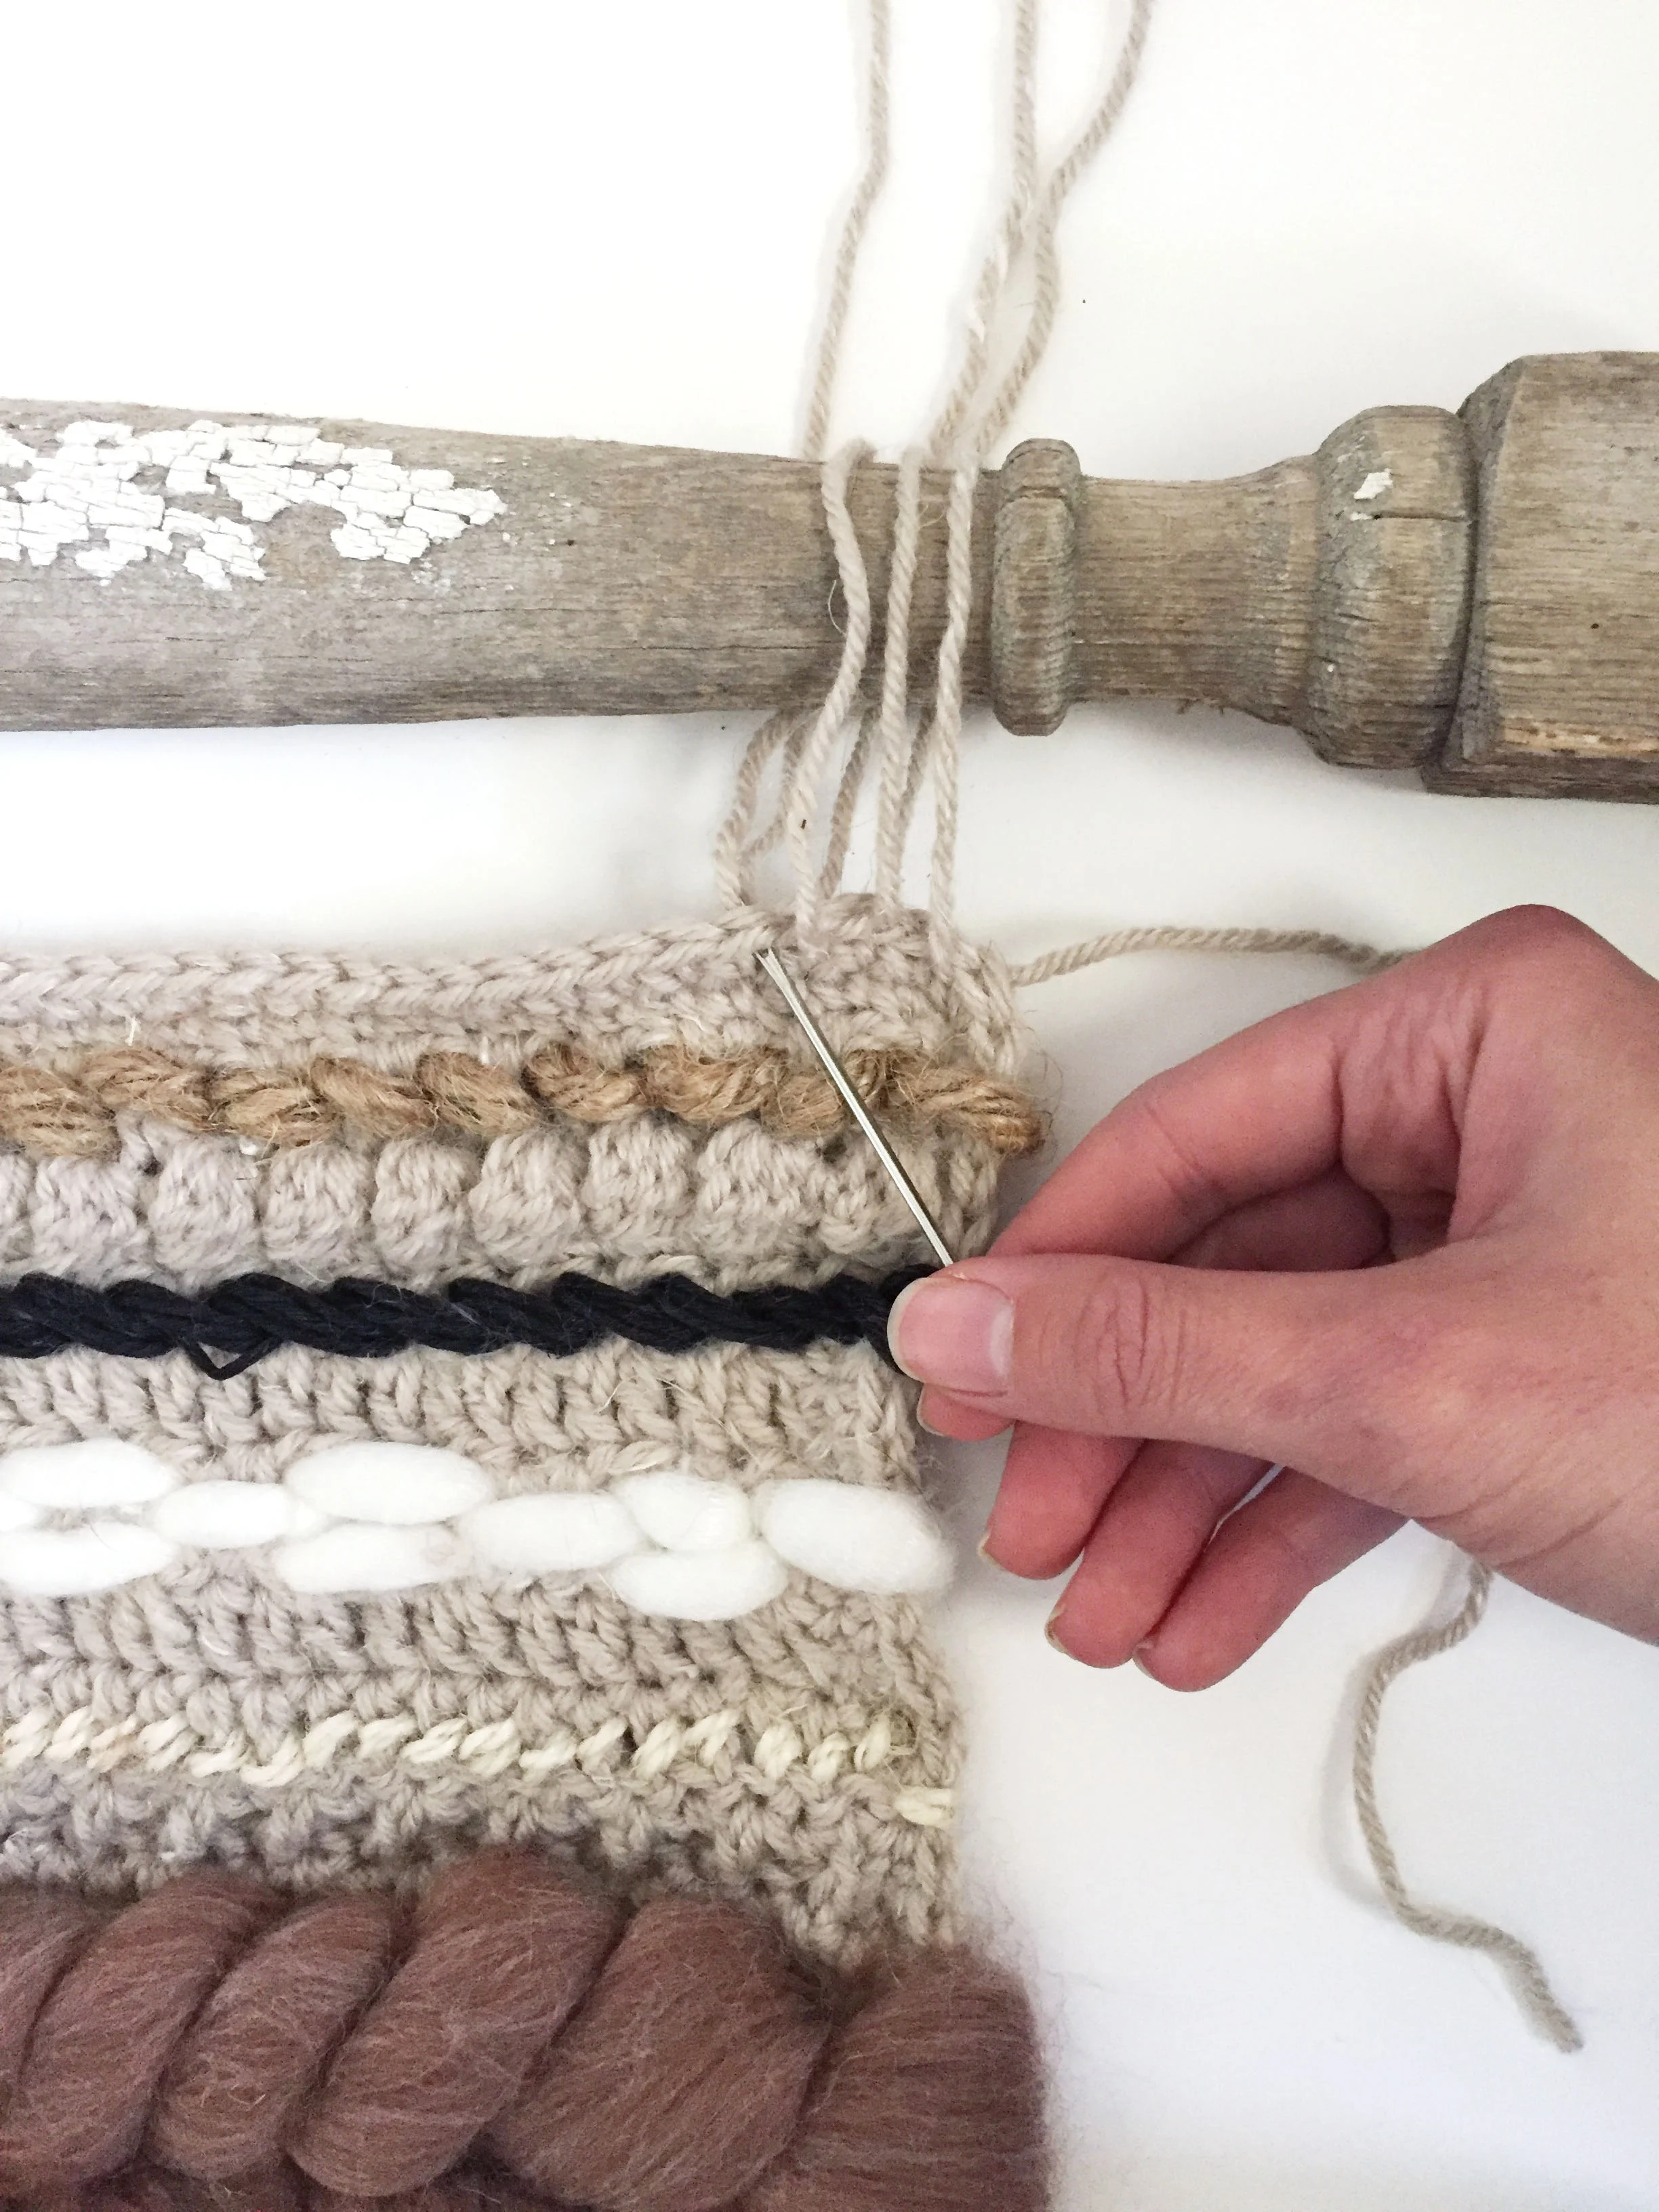
Now you're ready to work stitches into the towel. Grab your 2.25 mm hook and yarn, and insert the hook into the very edge of the towel (on the line you drew) and grab your yarn on the back side. It helped me to work my hook into one layer at a time, and to wiggle it while pushing into the fabric. 

Crochet Recipe Towels

Bring your yarn back through, and sc. Then ch 1.

Crochet Recipe Towels

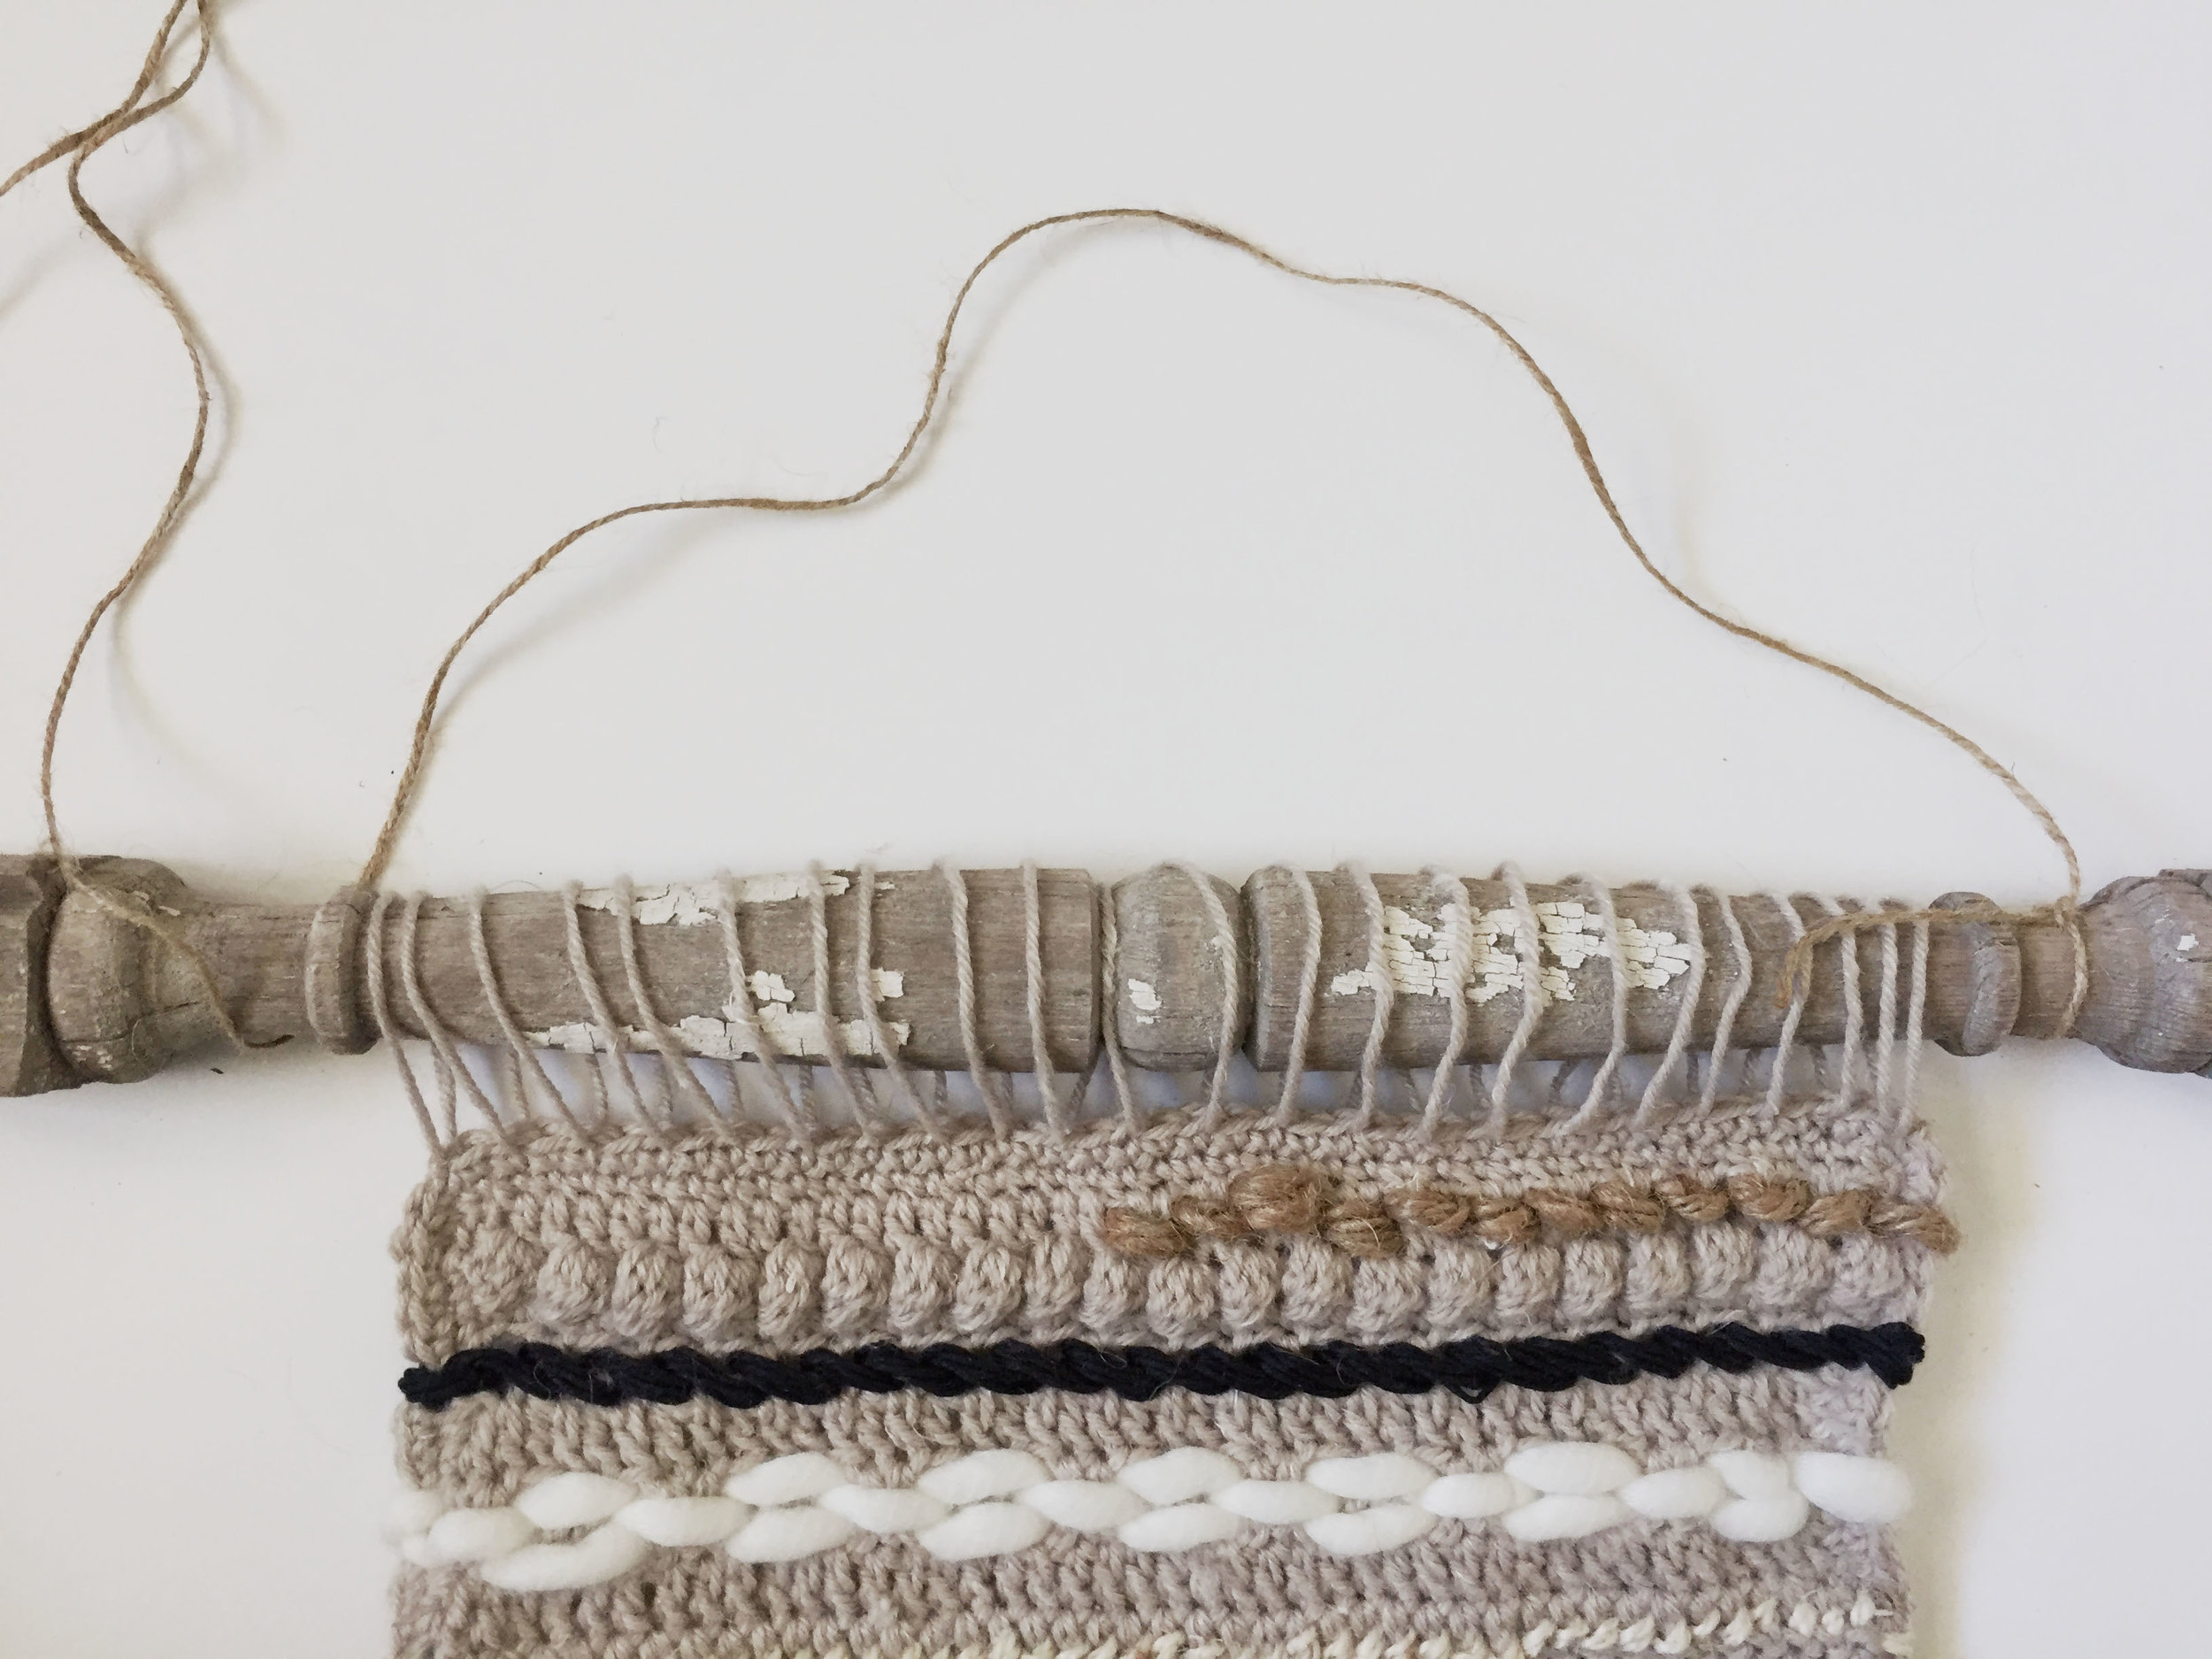
Insert your hook 1/4 away from the previous spot you inserted, and do the same thing-- sc, ch 1. Repeat this all the way across the top, when you work the last sc -- don't ch 1 at the very end.

Crochet Recipe Towels

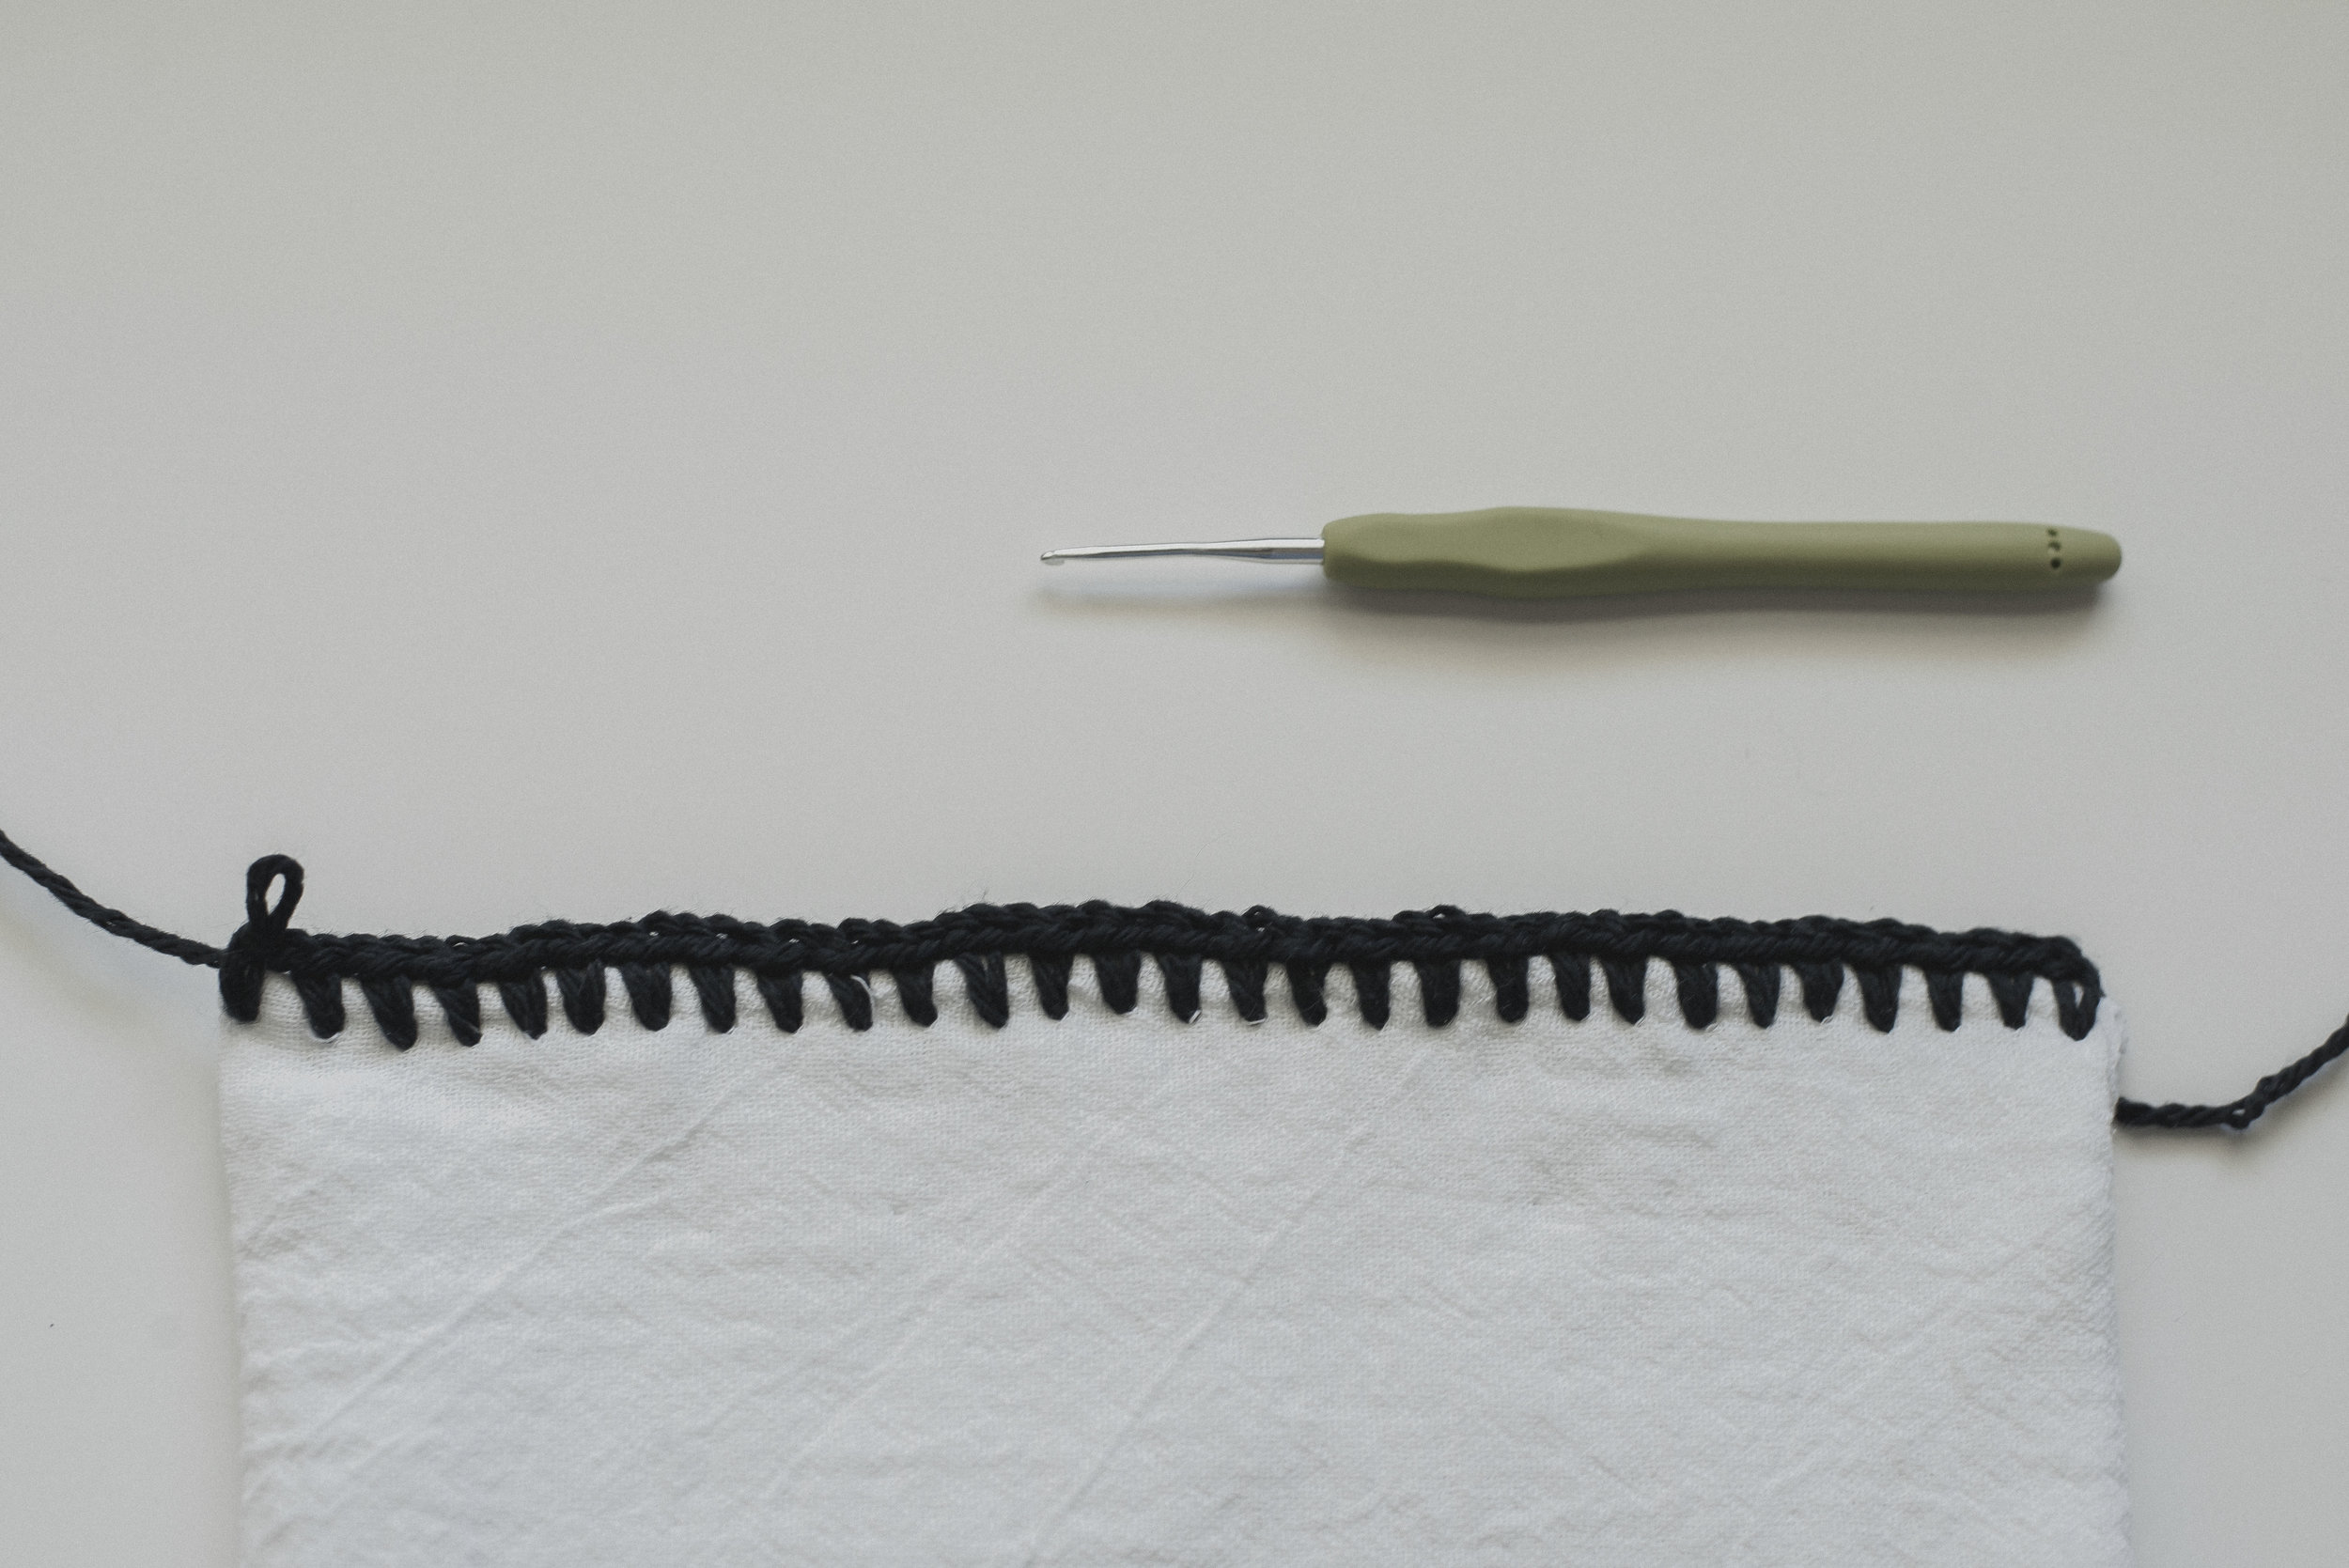
The image above shows the first row worked. Now you will switch to your i hook (5.5 mm).

Row 2) ch 1, turn, work hdc's into the "ch 1" spaces across the row 

Row 3) ch 1, turn, all BLO: hdc2tog, hdc2tog, hdc across row until there are four stitches left, hdc2tog, hdc2tog 

Row 4) ch 1, turn, all BLO: hdc across row

Row 5) repeat instructions from"row 3"

Row 6) repeat instructions from "row 4" 

Row 7) repeat instructions from "row 3"

Row 8) repeat instructions from "row 4" 

Row 9) repeat instructions from "row 3"

Rows 10-15) repeat instructions from "row 4"

Row 16) ch 1, turn, all BLO: hdc until you reach two middle stitches, ch 2, sk those two middle sts, hdc into remainder of sts

Row 17) ch 1, turn, all BLO: hdc2tog, hdc2tog, hdc until there are four stitches left (working hdc's into previous row's ch's) hdc2tog, hdc2tog

Row 18) ch 1, turn, all BLO: hdc across row

Finish off, weave in ends

Now you're ready to sew on the button...

Crochet Recipe Towel Tutorial

Place the button on the front side of the towel so it matches up with the hole you created in the crochet topper. I ended up placing mine about row 4.

Crochet Recipe Towel Tutorial

Sew on your button with needle and thread.

Crochet Recipe Towel Tutorial

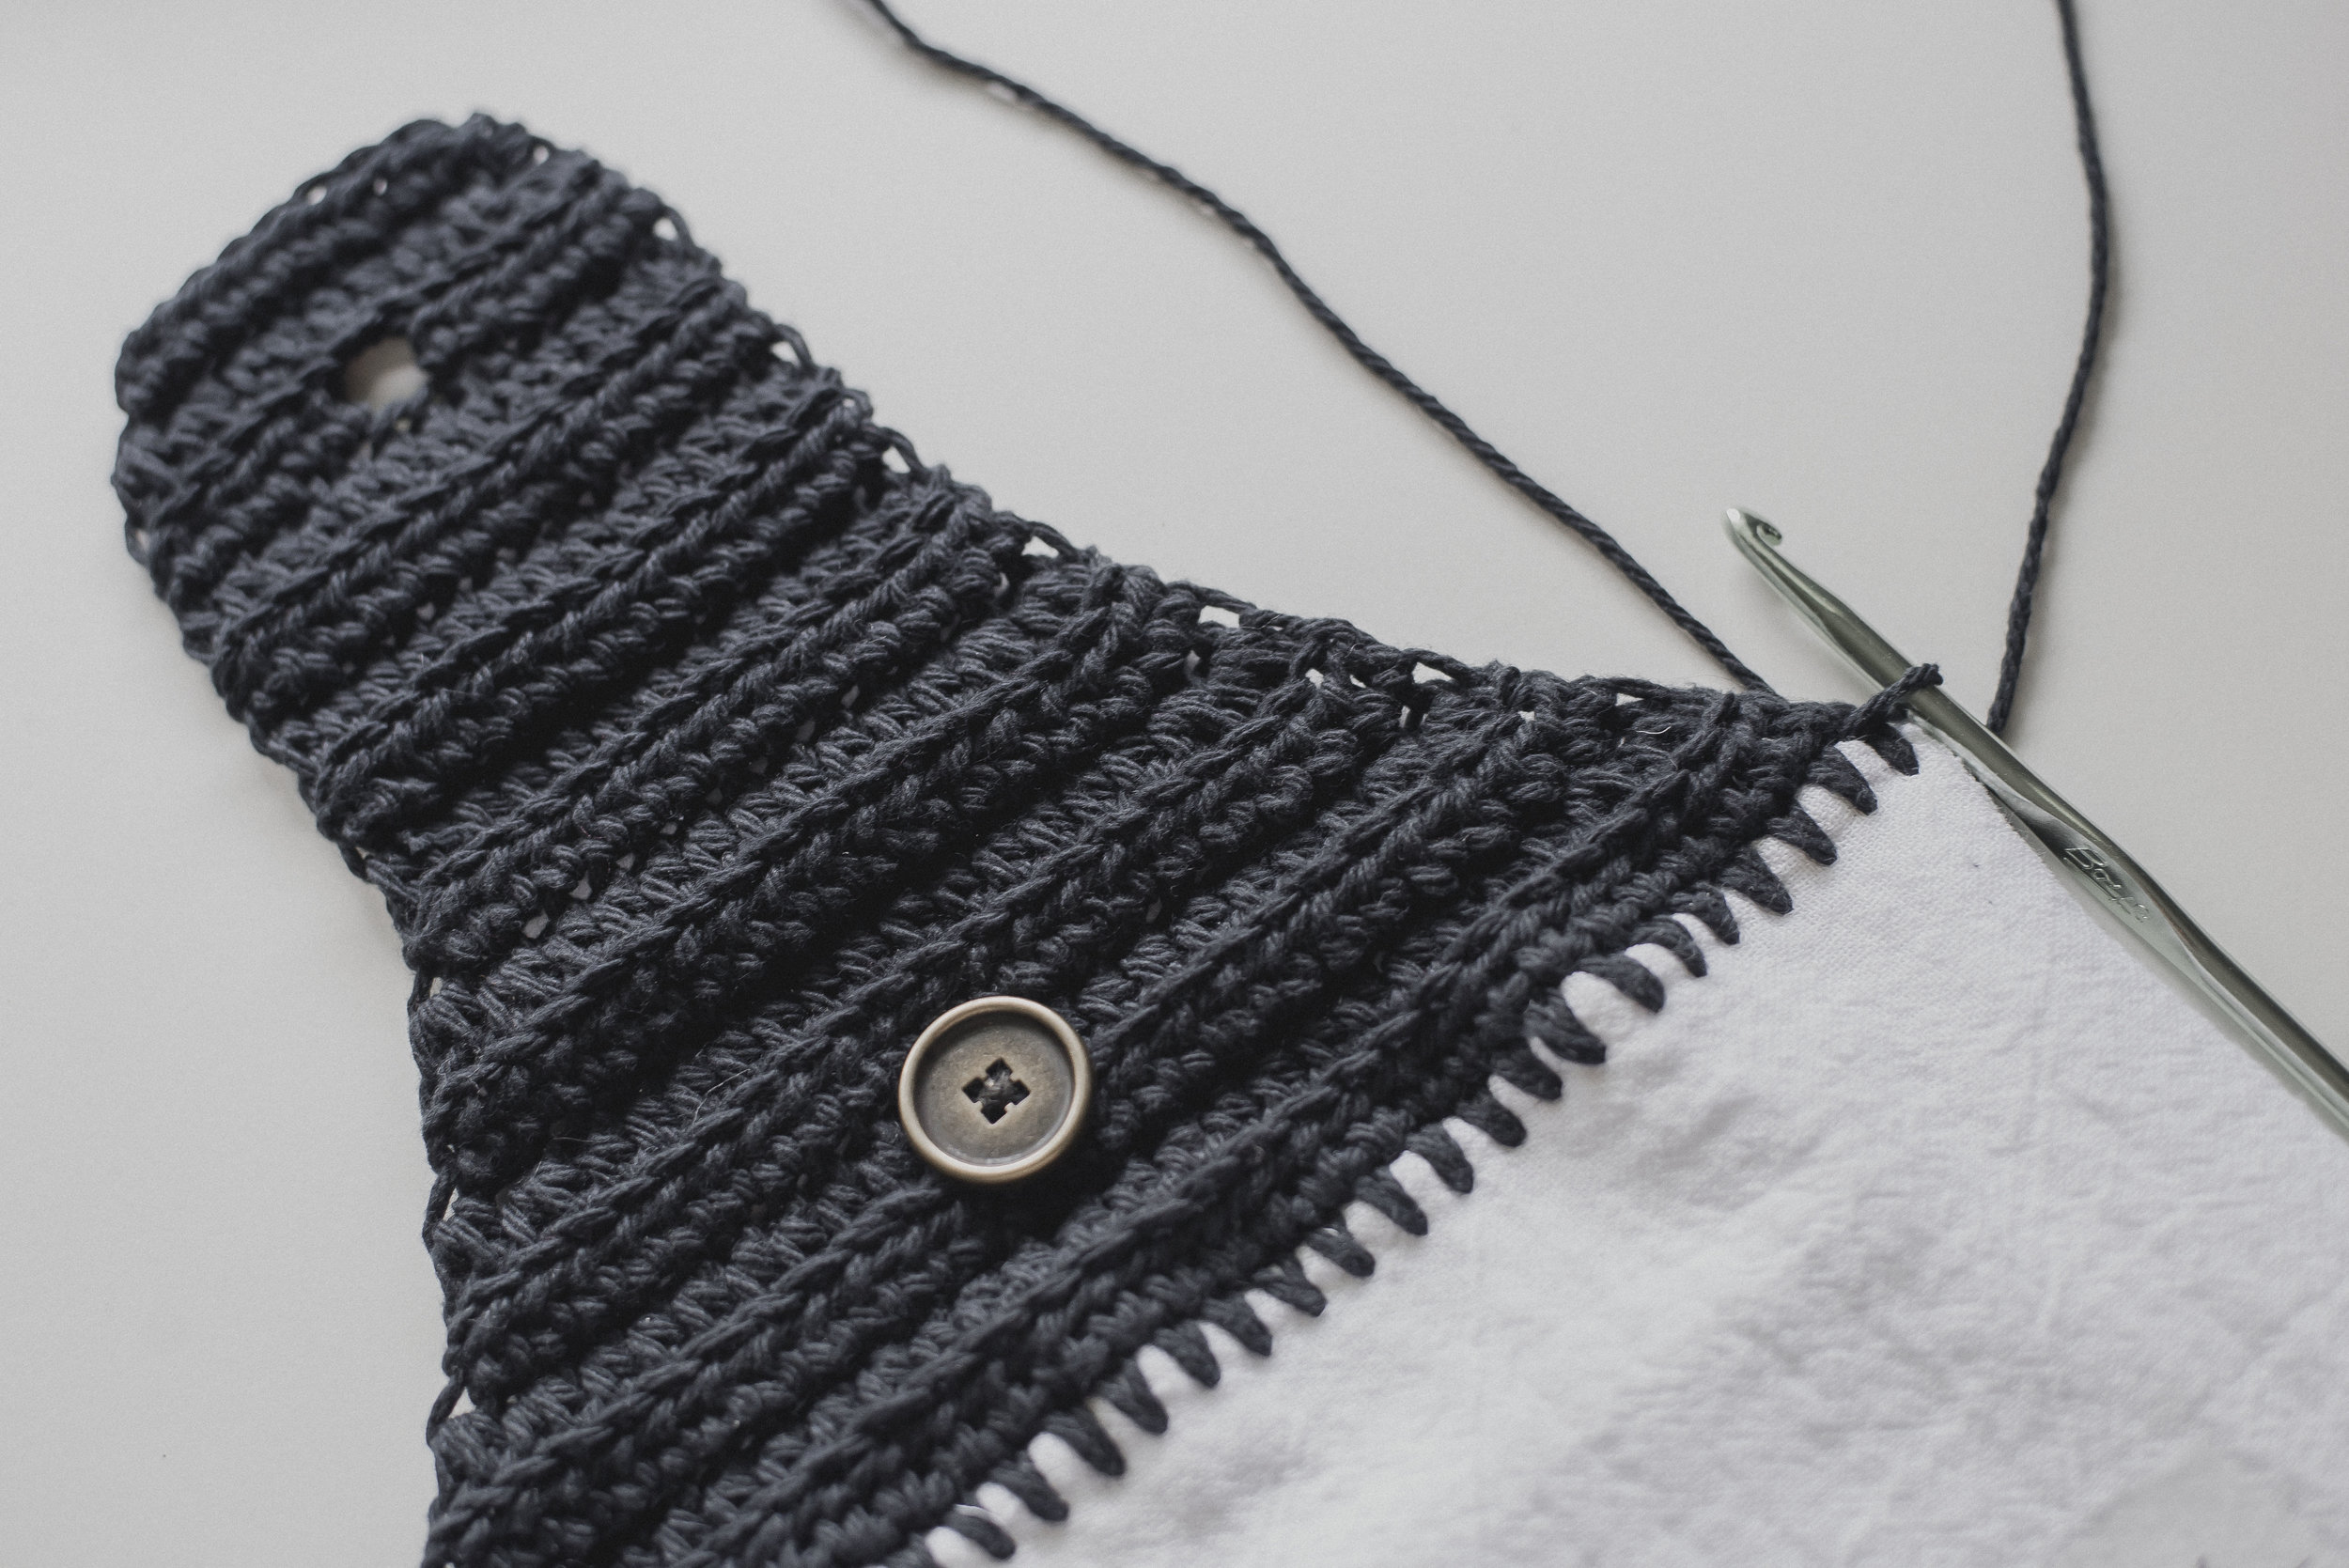
At this point I decided I wanted the edge to look a little neater, so I drew up my yarn with my 5.5 mm hook and worked sc's around the entire edge of the crocheted topper.

Crochet Recipe Towel Tutorial

I thought the sc edge looked so much nicer! Finish off and weave in all the ends.

Crochet Recipe Towel Tutorial

That concludes the Crocheted Recipe Towel tutorial! What a neat little project that is truly so special-- especially if the recipe is a family favorite. I hope this tutorial was helpful, and that you enjoy making these gems as much as I did. If you end up making one, please do share with me over on Instagram I'd love to admire it! :) 

Happy hooking!
Meg

Crochet Recipe Towel Tutorial - Megmade with Love

Free Crochet Pattern for a Crocheted & Woven Wall Hanging

Free Crochet Pattern for a Crocheted & Woven Wall Hanging

Soooo I've officially got a new favorite pattern. It's a crochet-meets-weaving home decor piece that makes an awesome statement! I've always been enamored by all the lovely woven wall hangings I've seen online, and thought I'd give it a try someday. But then it dawned on me I could put my own crochet twist on it and make it a super unique piece--I'm so pleased with how it came out!

Free Crochet Pattern for a Crocheted & Woven Wall Hanging

My favorite part about this project is that it is super customizable. Any fiber or material could be used.. literally ANYTHING. You could use up stuff you've got around the house-- which is what I mostly did. Ribbon, fabric, strings, jute, yarn, roving.. the possibilities are endless. And not to mention the color combinations! I loved the opportunity to get creative with the weaving.

Free Crochet Pattern for a Crocheted & Woven Wall Hanging

Above is a closeup of some of the woven details. I used this lacy burlap ribbon that made the coolest effect on the piece. And for this project I used basic weaving techniques that I walk you through below with plenty of photos. It's surprisingly simple!

What you'll need:

-worsted weight (4) yarn for the crocheted portion (I would suggest a "rougher" yarn, I made two-- one with Yarn Bee Rustic Romantic in Sugared Oats (linked here), and one with Caron Simply Soft in "Bone". I didn't like the results from the Simply Soft one, just because it's too soft and isn't as sturdy for the weaving.)
-size i hook (5.5mm) 
-yarn needle
-stick or wooden rod to hang the piece on (I used an old wooden spindle!)
-extra materials to weave into the crocheted piece. I used roving from Hobby Lobby called Showstopper in color Cedar (linked here), and also a fluffy roving type yarn called Astounding in color White (linked here), burlap ribbon, other yarns and strings I found lying around my house. You could use anything that strikes your fancy-- ribbon, fabric, raffia. 

Abbreviations:

ch=chain, st(s)=stitch(es), sc=single crochet, dc=double crochet, bo=bobble stitch, hdc=half double crochet, sk=skip, sp=space

Measurements:

finished crocheted piece measures 11.5" tall by 12" wide

Notes:

-chains at the beginning of the rows do not count as stitches unless otherwise specified in the pattern

-all stitches are worked into the previous row's stitches, not the spaces

-the pattern could be customized very easily to make a unique piece. You could switch around rows to your liking for the weaving to look different. If you wanted to make the piece smaller or bigger you would just need to chain an even-numbered multiple of three, plus 3 for turning chain.

-below is a description of how to work bobble stitch-- (or view this video for assistance) **please note that for this pattern I call for a 3-stitch bobble, meaning you work 3 partial dc's in one stitch**:

bo: yo, insert hook into designated stitch, draw loop back through, yo, draw through first two loops on your hook, [yo, insert hook into the same stitch, draw loop back through, yo, draw through first two loops on your hook], repeat [ ] one more time, you will end up with four loops on your hook, yo, and pull through all four loops to complete the bobble stitch

Crochet Wall Hanging

Pattern:

Row 1) ch 45, dc into 4th ch from hook and across (42 total sts, and for the rest of the pattern)

Row 2) ch 2, [bo, sc] across row

Row 3) ch 1, sc across row

Row 4) ch 3 (the 3rd chain counts as a "ch 1"), sk first st, hdc in next st, [ch 1, sk st, hdc in next st] across row 

Row 5) ch 3, dc across row (the last dc will be worked into the 3rd ch from the beginning of the previous row)

Row 6) ch 4 (4th chain counts as a "ch 1"), sk first st, dc, dc, [ch 1, sk st, dc, dc] across row

Row 7) ch 3, dc across row (the last dc will be worked into the 4th ch from the beginning of previous row)

Row 8) ch 3, dc across row

Row 9) ch 3, sk first st, dc, working behind dc just worked: dc into skipped st, [sk next st, dc, working behind dc just worked: dc into skipped st] across row (you are creating little crossed dc x's in this row)

Row 10) ch 3, dc across row

Row 11) ch 5 (last two chains counts as a "ch 2"), sk first two sts, dc, [ch 2, sk two sts, dc] across row

Row 12) repeat Row 11, working dc's into the sts, not the spaces.

Rows 13 & 14) ch 3, dc across row

Row 15) ch 4 (4th chain counts as "ch 1"), sk first st, dc, [ch 1, sk st, dc] across row

Row 16) ch 2, [bo, sc] across row

Row 17) ch 3, dc across row

Row 18) ch 3 (the 3rd chain counts as a "ch 1"), sk first st, hdc in next st, [ch 1, sk st, hdc in next st] across row 

Row 19) ch 3, dc across row (the last dc will be worked into the 3rd ch from the beginning of the previous row)

Rows 20 & 21) ch 3, dc across row

At this point, you will sc around the perimeter of the piece..

-Ch 1, and work sc's around the entire outside, adding an extra sc in the corners so it will lay flat, then join to first sc when you make it all the way around. 

Repeat the above instructions and go around the piece one more time with your sc's

Finish off, weave in ends

Now you're ready for the fun, creative part-- the weaving!

Crochet Woven Wall Hanging

First let's start with the big roving middle part-- the braid-looking weave. This weaving technique is called the "Soumak Weave", it makes such a standout and beautiful detail. I cut a piece of my roving about 8-9 feet long for this weave, and taped the end to make it easier to insert into the spaces as well as keep it from fraying and making a mess! 

**It's very important to note that you should be careful to not weave too tightly and watch your tension with all the weaves because it will bring in the sides of your crocheted piece and make it look wonky. Just keep that in mind and check it as you weave!

**For this tutorial, I made a second crocheted piece to take pictures of the "how to" and I realized afterwards that I made this braided part a looser weave than with my first one-- the finished one you see in the pictures at the top of this post. To make a tighter weave that has more "braids", all you'll need to do is insert your roving one space back.

Crochet Woven Wall Hanging

For the roving portion, you'll use the big slots in the middle of the crocheted piece.

Pull your roving through into the second space from the under-side (shown above) leaving about a 5-6 inch tail to be woven into the back. 

Crochet Woven Wall Hanging

Then using your long side of the roving- go over the outside of the crocheted piece and back under. Then pull the roving up through the first space.

Crochet Woven Wall Hanging

Next you'll skip a space put your roving into it, then pull through the skipped space, like in the photo above. Remember if you'd like more "braids" then you can put your roving into the next space (don't skip one) and pull through the space to the right of it.

Crochet Woven Wall Hanging

Pull it through all the way, and adjust to your liking. Remember not to pull too tightly so the weaving doesn't become too tight.

Crochet Woven Wall Hanging

You will repeat that across the row until you run out of spaces. To turn and go back, and to create the bottom part of the "braid", then you'll go over the side of the crocheted piece and up into the second space, shown in the photo above.

Crochet Woven Wall Hanging

Once that's pulled through, then you'll go over the side of the crocheted piece once more and up into the first space like shown in the photo above.

Crochet Woven Wall Hanging

Then you'll repeat that same process you did along the top across.

Crochet Woven Wall Hanging

In the photo above, you can see the "braids" all complete! You can weave the ends into the back side, working in and out of the stitches.

I used this soumak weaving technique for a lot of my materials, even the burlap ribbon-- except I didn't go back a second time. If you don't go back a second time, it creates a cool twisted weave that looks great too!

Next, I'll show you how to do the plain weaving technique. I used this weave quite a bit too, it's the most basic form of weaving and creates a simple and pretty look.

Crochet Woven Wall Hanging

Depending on what material you're using, either tape the end or use a needle and all you'll be doing is going in and out of the stitches like shown above. It's kinda like you're doing a running stitch in sewing. You could do this anywhere on the crocheted piece, for the thicker materials I used the rows that had the open spaces. I also wove into plain dc rows with some white yarn.

Crochet Woven Wall Hanging

Once you get to the other side with your weaving, going in and out of the stitches, you'll go around the side of the crocheted piece and go back the other direction (if you choose to do so, one time looks great too!). When you go the opposite direction you will be inserting your yarn in the opposite way of the way you just came. You can see it in the photo above, you will go "under" where previously you went "over".

Crochet Woven Wall Hanging

For this particular yarn I chose to go back one last time, going around the outside of the crocheted piece one more time and weaving back to the other side. For this bottom weave, you will also work the yarn opposite of the weave above it, shown in the photo above. Basically working the weave like you did the very first go across.

Next up is how to add on some tassels!

Crochet Woven Wall Hanging

Prepare a grouping of however many strands your heart desires, double the length of how long you want the tassels to be and fold them in half. Then you'll insert the folded part into the space you'd like the tassel to be, not pulling all the way through (it helped me to use a crochet hook). Then grab the ends of the tassel and pull them through the folded loop.

Crochet Woven Wall Hanging

Pull down the ends and adjust the knot to your liking to finish the tassels. You could add tassels anywhere! I added them all along the bottom also. They make a fun and textured addition to the weaving.

That's basically the few weaving techniques I used for this piece. I'm sure there are way more out there, and you could find how to do them on Youtube probably! I think the biggest thing for me was varying the different kind of materials I had to make the piece unique and fit in my decor. 

And you don't have to be limited to the areas that have spaces, work your weaves anywhere and everywhere! 

When you're done, weave in all the ends onto the back side.

Crochet Woven Wall Hanging

To connect the piece onto your rod or stick, grab a loooong piece of yarn or string and your yarn needle. You'll insert the needle and yarn into the top of your weaving, and up over the rod and through the back side of the weaving. I chose to go about every other stitch all the way across. Be sure to make the passes even so the weaving will hang straight. It could be however loose or tight you'd like.

Crochet Woven Wall Hanging

Once the piece is connected you can connect a piece of jute or string on top of the rod by knotting it on each side-- this is for hanging it to the wall.

Crochet Woven Wall Hanging

Then all you need to do is hang your kick-butt wall hanging up in your home! If you make your very own rendition of this piece, I would LOVE to see it... tag me over on Instagram. I hope you have fun with this pattern- flex those creative muscles with unique weaves! Enjoy!

Meg

Free Crochet Pattern for a Crocheted & Woven Wall Hanging